Account Management
AVAILABLE IN: 

Introduction
The Accounts on Reluna is a central component of the platform, used to create, view, manage and edit client accounts. These accounts are fundamental building blocks in tracking relationships with clients, whether they are individuals, legal entities or companies.
Key Terminologies
Term (A-Z) | Description |
|---|---|
Company Account | A legal entity account created specifically to manage PROP or OMNIBUS portfolios. |
Entity | A legal organization such as a business or institution. |
Individual | A personal client account created for a single individual. |
👉 New to some terms? Check out our full Platform Glossary for more.
Permission Requirement
Platform Name | Permission ID | Permission Level |
|---|---|---|
Accounts | Accounts | View, Modify, Create, Delete |
Setting Up Account
This section explains how to create different types of Accounts in the platform: Individual, Entity and Company Accounts.
Go to Accounts > find Accounts tab.
Click the ➕ icon to add a new account.

Create New Account window opens. Choose from what you want to create, as highlighted.
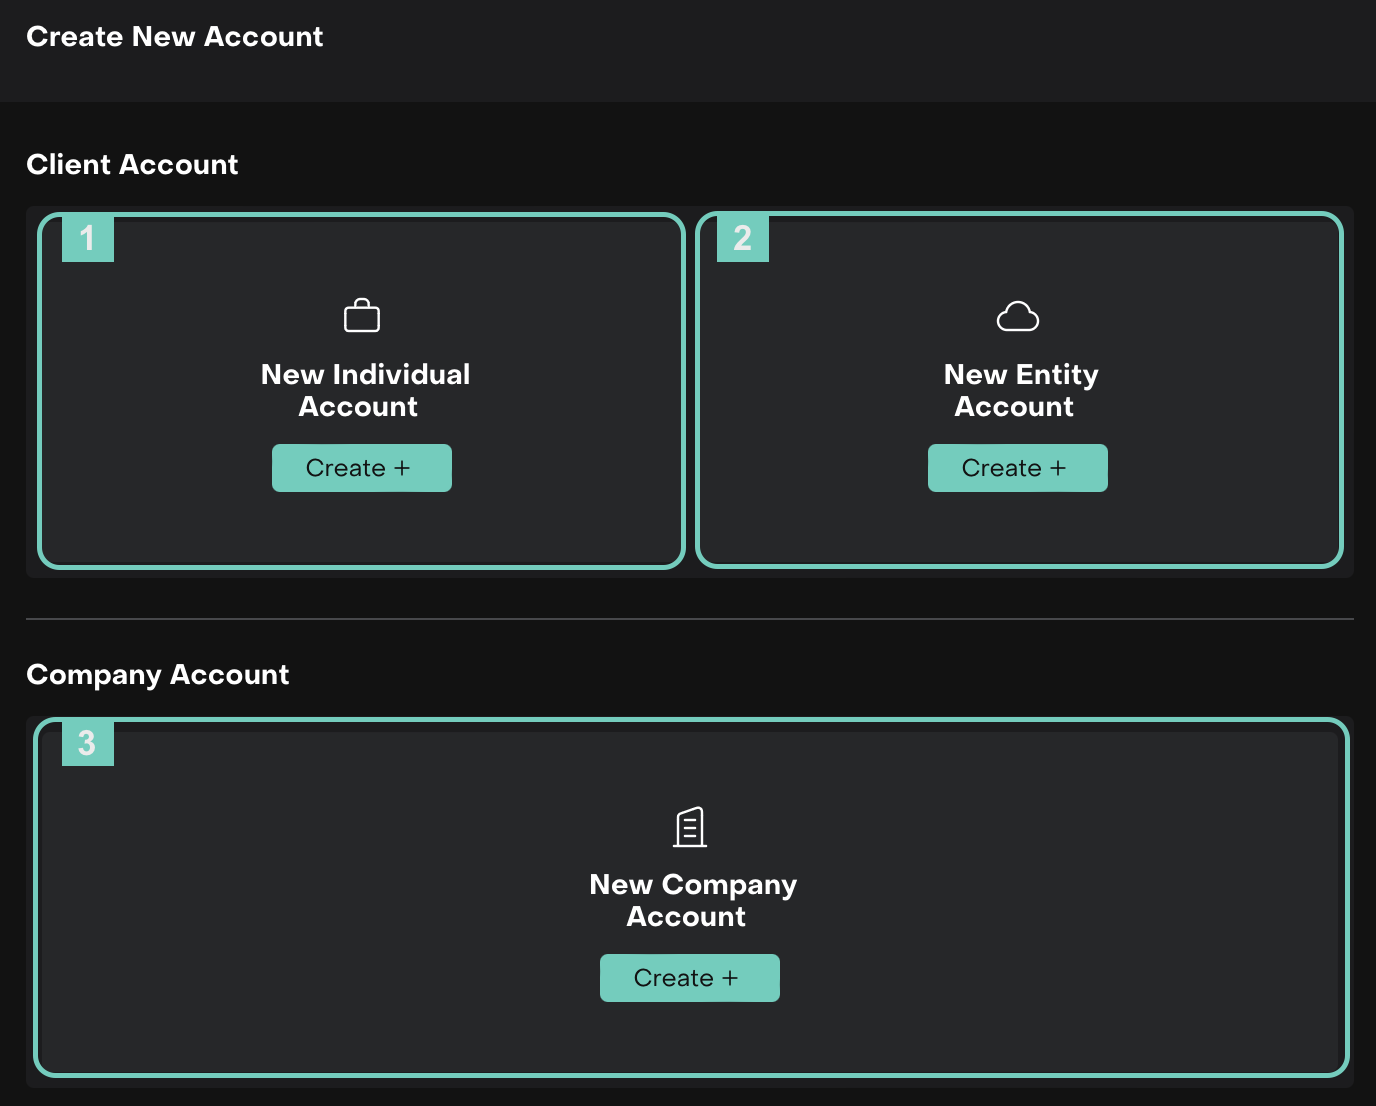
1. Create an Individual Account
On click of it, a form opens, where you need to fill in the required details (see the field reference table below).
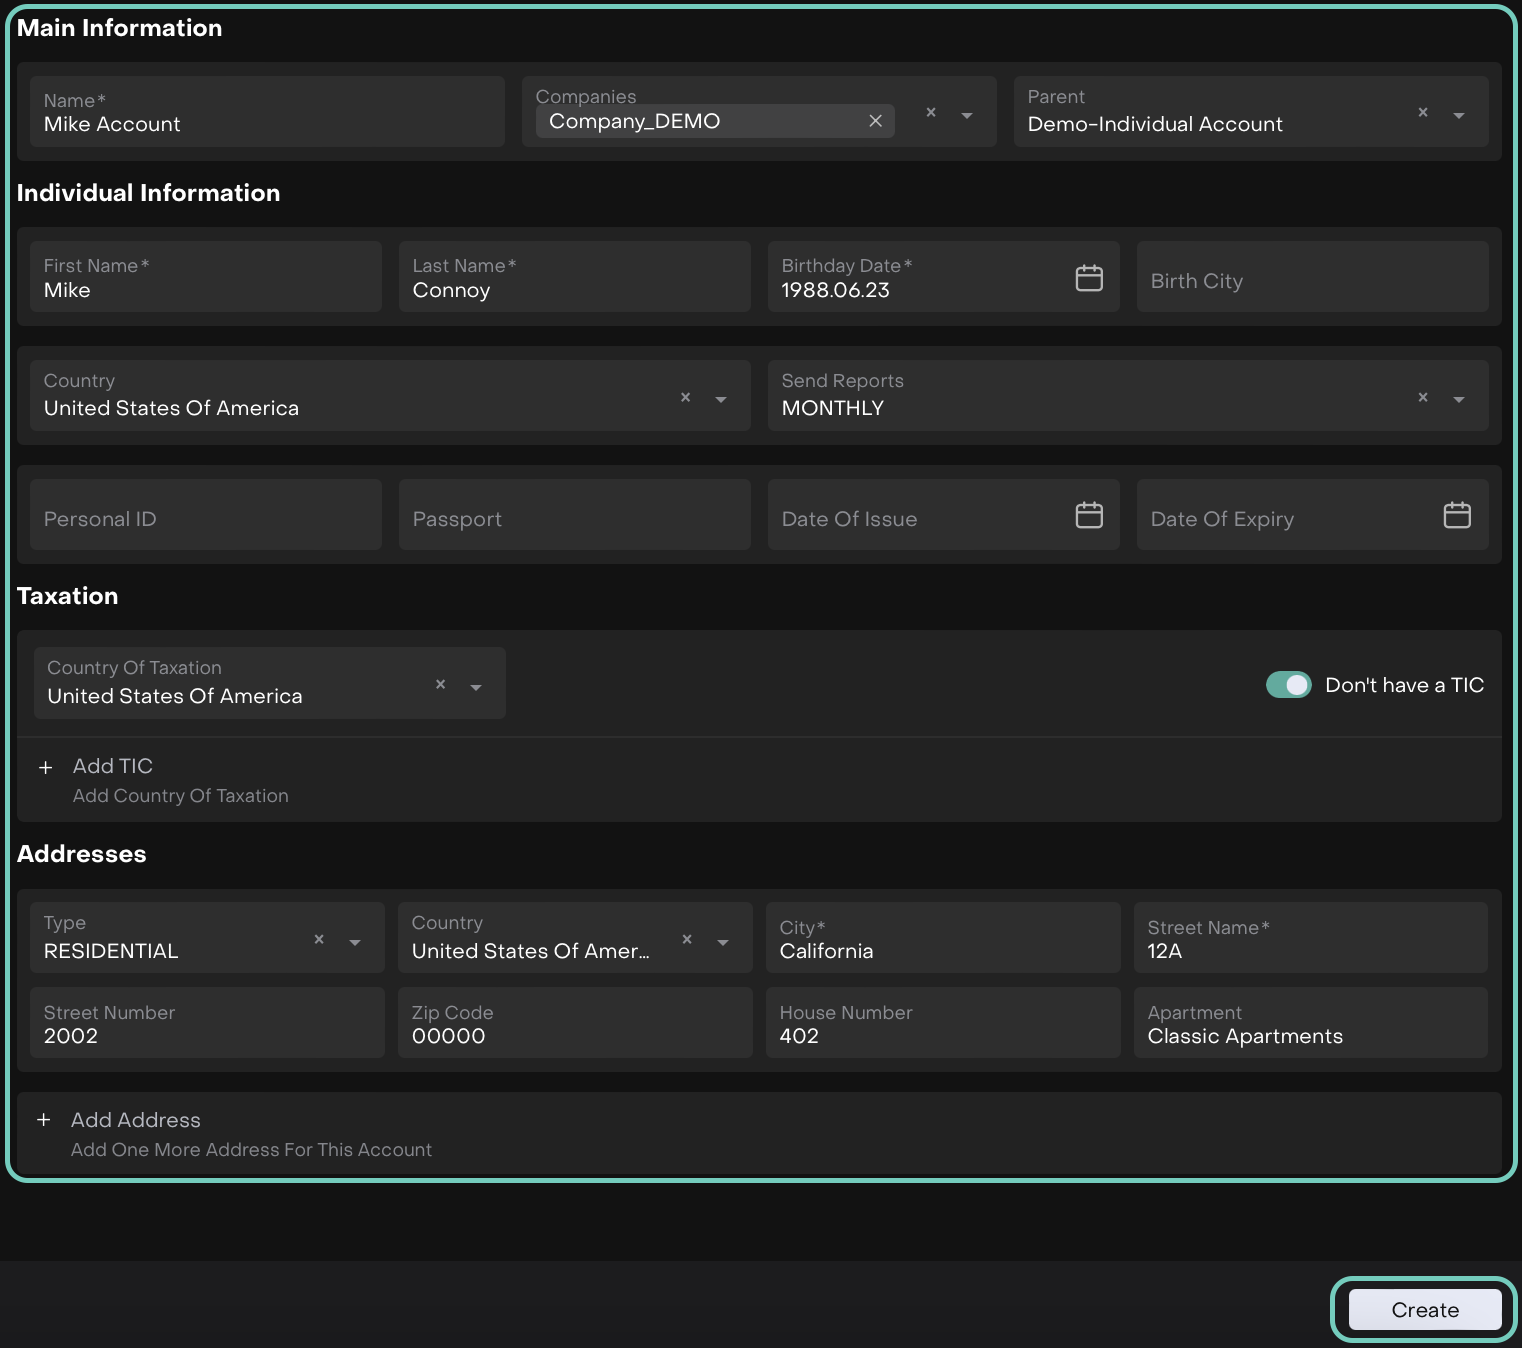
The Parent field defines the hierarchical relationship between accounts.
For corporate clients: the Parent represents the Ultimate Beneficial Owner (UBO) or the controlling legal entity.
For individual clients: the Parent may represent a household head or another higher-level individual in the client hierarchy. (This is not a legal classification; it is used strictly for structural grouping).
This hierarchical structure is used to build the account tree together with their associated portfolios.
Field Name | Definition / What to Fill In | Field Type | Validation / Rules |
|---|---|---|---|
Main Information | |||
Name (*) | Enter the Entity Account name. | Free-typing | Free text allowed. |
Companies (*) | Select the company to which this account belongs. | Dropdown (Companies list) | Must be chosen from Companies list. |
Parent | Select the parent entity (if any). | Dropdown (Entities list) | Optional. Must exist in Entities list. |
Individual Information | |||
First Name (*) | Enter the first name of the individual linked to the entity. | Free-typing | Letters only, no numbers or symbols. |
Last Name (*) | Enter the last name of the individual linked to the entity. | Free-typing | Letters only, no numbers or symbols. |
Birthday Date (*) | Select the birth date. | Date Selector | Can be future-dated. |
Birth City | Enter the city of birth. | Free-typing | Optional. Letters only. |
Country (*) | Select the country of residence. | Dropdown (Countries list) | Must exist in Countries list. |
Send Reports | Select frequency of reports. | Single Choice list | Optional. Choose from:
|
Personal ID | Enter national ID or equivalent. | Free-typing | Optional. Letters and numbers only. |
Passport | Enter passport number. | Free-typing | Optional. Letters and numbers only. |
Date of Issue | Enter passport issue date. | Date Selector | Optional. Cannot be later than expiry date. |
Date of Expiry | Enter passport expiry date. | Date Selector | Optional. Can be future-dated. |
Taxation | |||
Country of Taxation (*) | Select the taxation country. | Dropdown (Countries list) | Must exist in Countries list. |
TIC | Tax Identification Code. | Free-typing (active if toggle ON) | Mandatory if toggle ON. Optional if toggle OFF. |
Addresses | |||
Type (*) | Select address type. | Dropdown | Options are:
|
Country (*) | Select address country. | Dropdown (Countries list) | Must exist in Countries list. |
City (*) | Enter city name. | Free-typing | Free text allowed. |
Street Name (*) | Enter street name. | Free-typing | Free text allowed. |
Street Number | Enter street number. | Free-typing | Optional. Free text allowed. |
Zip Code | Enter postal/zip code. | Free-typing | Optional. Free text allowed. |
House Number | Enter house number. | Free-typing | Optional. Free text allowed. |
Apartment | Enter apartment/unit name. | Free-typing | Optional. Free text allowed. |
Once all fields are filled, click Create to save the account.
Post creation, use the three dots to Edit and manage related objects on the platform.

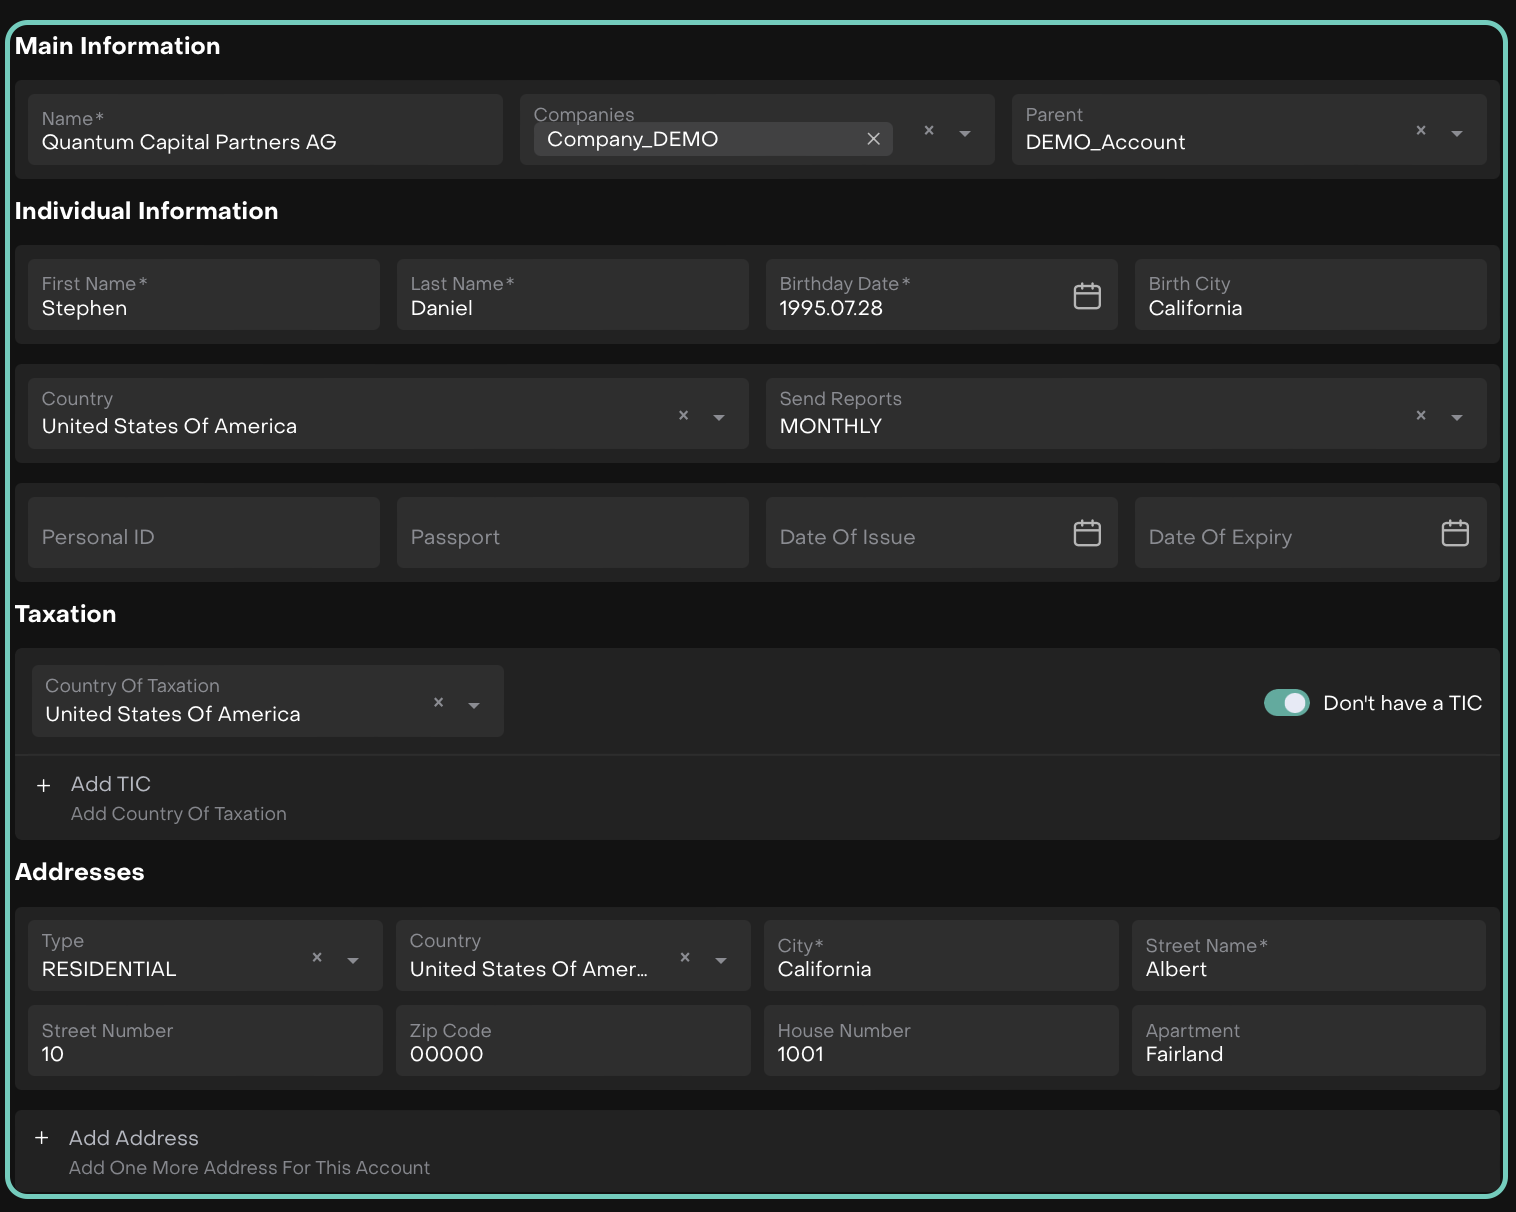
2. Create an Entity Account
An Entity Account must always be linked to a Beneficial Owner (Individual Account).
A. Create New
Select the Create New tab.

A form opens, where you need to fill in the required details (see the field reference table below).
Field Name | Definition / What to Fill In | Field Type | Validation / Rules |
|---|---|---|---|
Main Information | |||
Name (*) | Enter the Entity Account name. | Free-typing | Free text allowed. |
Companies (*) | Select the company to which this account belongs. | Dropdown (Companies list) | Must be chosen from Companies list. |
Parent | Select the parent entity (if any). | Dropdown (Entities list) | Optional. Must exist in Entities list. |
Individual Information | |||
First Name (*) | Enter the first name of the individual linked to the entity. | Free-typing | Letters only, no numbers or symbols. |
Last Name (*) | Enter the last name of the individual linked to the entity. | Free-typing | Letters only, no numbers or symbols. |
Birthday Date (*) | Select the birth date. | Date Selector | Can be future-dated. |
Birth City | Enter the city of birth. | Free-typing | Optional. Letters only. |
Country (*) | Select the country of residence. | Dropdown (Countries list) | Must exist in Countries list. |
Send Reports | Select frequency of reports. | Single Choice list | Optional. Choose from:
|
Personal ID | Enter national ID or equivalent. | Free-typing | Optional. Letters and numbers only. |
Passport | Enter passport number. | Free-typing | Optional. Letters and numbers only. |
Date of Issue | Enter passport issue date. | Date Selector | Optional. Cannot be later than expiry date. |
Date of Expiry | Enter passport expiry date. | Date Selector | Optional. Can be future-dated. |
Taxation | |||
Country of Taxation (*) | Select the taxation country. | Dropdown (Countries list) | Must exist in Countries list. |
TIC | Tax Identification Code. | Free-typing (active if toggle ON) | Mandatory if toggle ON. Optional if toggle OFF. |
Addresses | |||
Type (*) | Select address type. | Dropdown | Options are:
|
Country (*) | Select address country. | Dropdown (Countries list) | Must exist in Countries list. |
City (*) | Enter city name. | Free-typing | Free text allowed. |
Street Name (*) | Enter street name. | Free-typing | Free text allowed. |
Street Number | Enter street number. | Free-typing | Optional. Free text allowed. |
Zip Code | Enter postal/zip code. | Free-typing | Optional. Free text allowed. |
House Number | Enter house number. | Free-typing | Optional. Free text allowed. |
Apartment | Enter apartment/unit name. | Free-typing | Optional. Free text allowed. |
Once you’ve filled in all the required fields, click Create to proceed.
After the account is created, you can use the three-dot menu to Edit or Delete the account on the platform.

B. Add Existing
Select Add Existing tab.
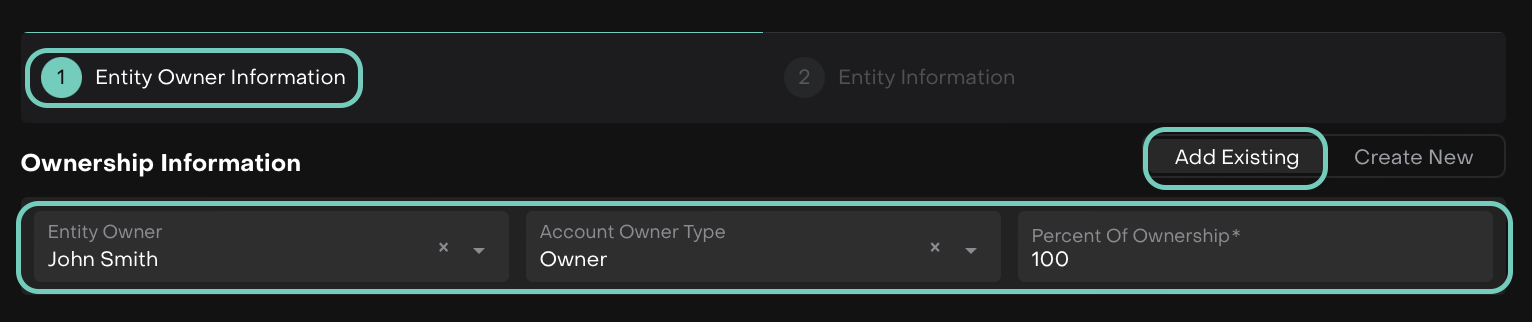
In Stepper 1 - Entity Owner Information, fill in the required details (see the field reference table below).
Field Name | Definition / What to Fill In | Field Type | Validation / Rules |
|---|---|---|---|
Entity Owner (*) | Select the beneficial owner (linked Individual Account). | Dropdown (Individual Accounts list) | Must be selected from existing Individual Accounts. |
Account Owner Type (*) | Specify the ownership type. | Single Choice list | Choose from:
|
Percent of Ownership (*) | Enter the percentage of ownership held by the selected owner. | Numeric input | Must be a valid number between 0 and 100. Decimal values allowed. |
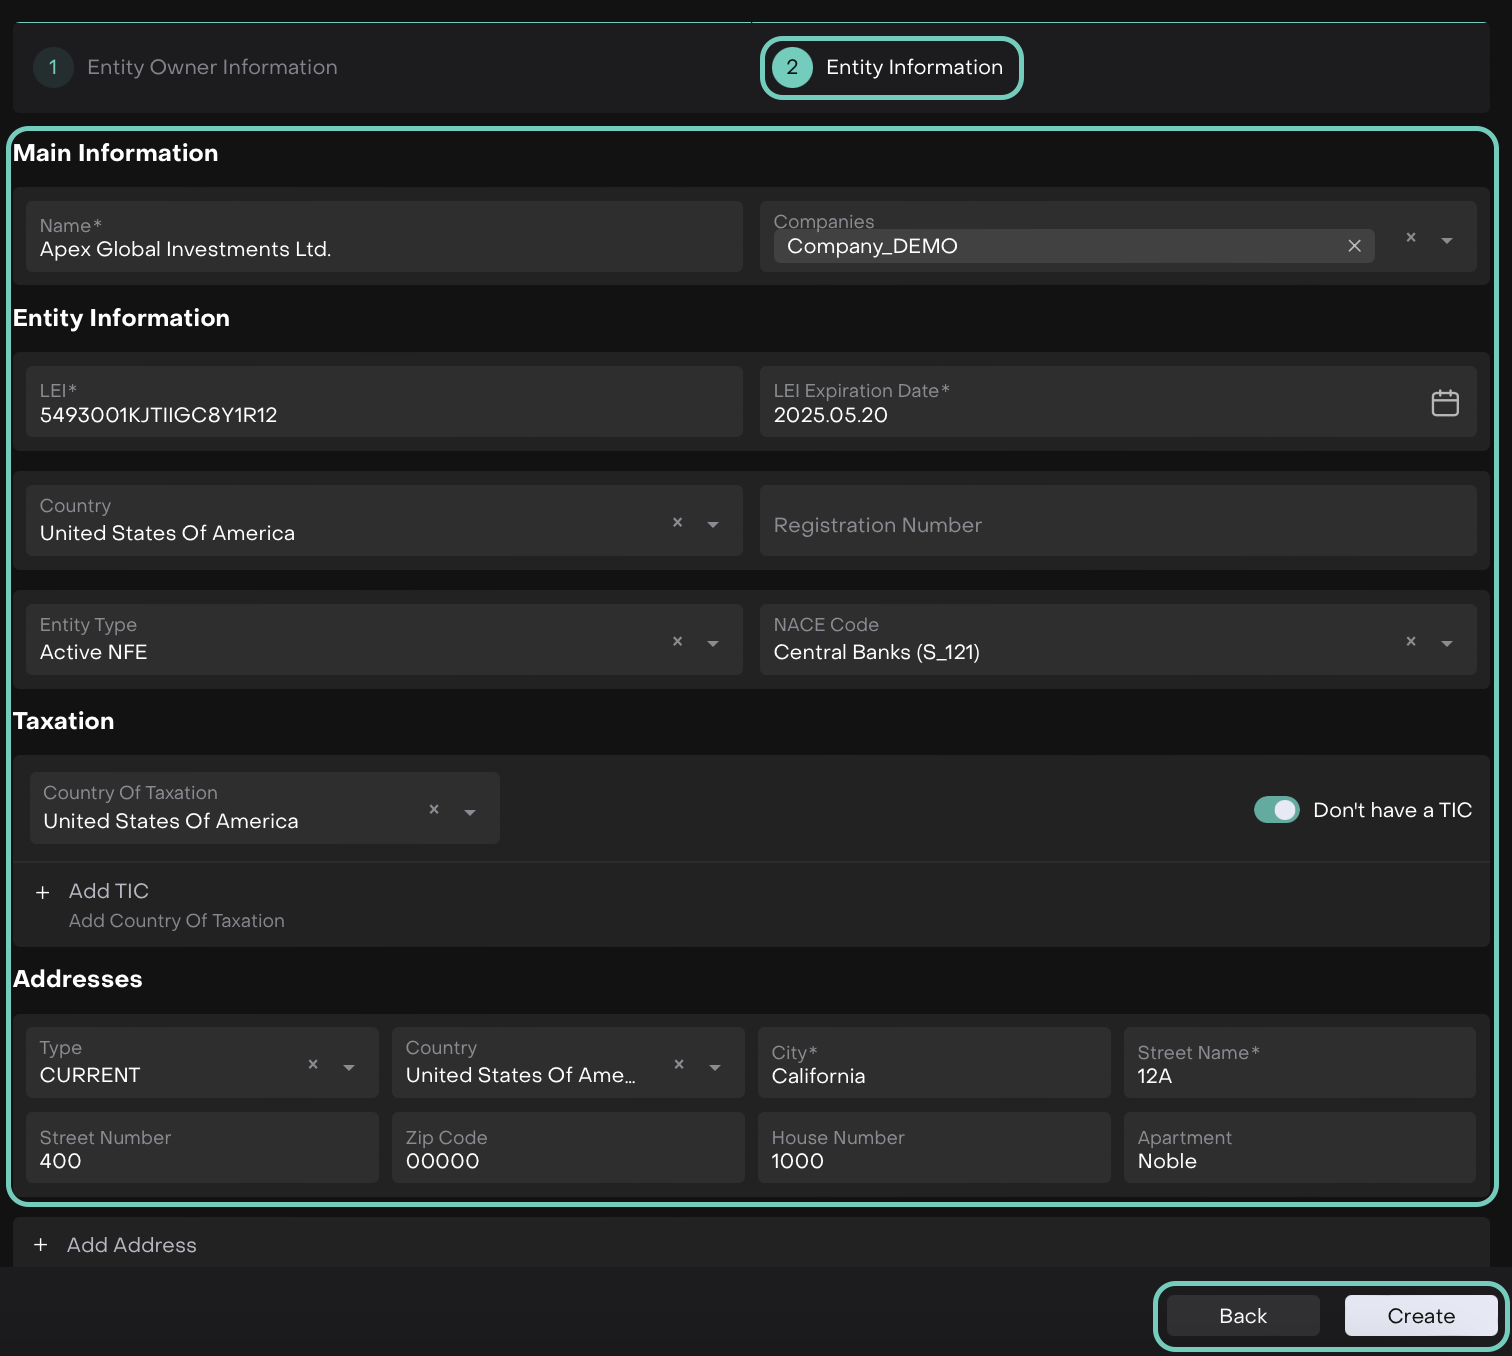
Click Next and Stepper 2 - Entity Information form opens, fill in the required details (see the field reference table below).
Field Name | Definition / What to Fill In | Field Type | Validation / Rules |
|---|---|---|---|
Main Information | |||
Name (*) | Enter the Entity Account name. | Free-typing | Free text allowed. |
Companies (*) | Select the company to which this account is linked. | Dropdown (Companies list) | Must be chosen from the Companies list. |
Entity Information | |||
LEI (*) | Enter the Legal Entity Identifier (20-character alphanumeric code). | Free-typing | Letters and numbers only. Must follow LEI format. |
LEI Expiration Date (*) | Enter the expiration date of the LEI. | Date Selector | Must be a valid future date. |
Country (*) | Select the country where the entity is registered. | Dropdown (Countries list) | Must be selected from Countries list. |
Registration Number | Enter the official company registration number. | Free-typing | Optional. Letters and numbers only. |
Entity Type | Select the classification of the entity. | Dropdown (Single Choice) | Options & When to Choose:
|
NACE Code | Select the entity’s NACE classification. | Dropdown (Single Choice) | Options are:
|
Taxation | |||
Country of Taxation (*) | Select the taxation country. | Dropdown (Countries list) | Must exist in Countries list. |
TIC | Tax Identification Code. | Free-typing (active if toggle ON) | Mandatory if toggle ON. Optional if toggle OFF. |
Addresses | |||
Type (*) | Select address type. | Dropdown | Options are:
|
Country (*) | Select address country. | Dropdown (Countries list) | Must exist in Countries list. |
City (*) | Enter city name. | Free-typing | Free text allowed. |
Street Name (*) | Enter street name. | Free-typing | Free text allowed. |
Street Number | Enter street number. | Free-typing | Optional. Free text allowed. |
Zip Code | Enter postal/zip code. | Free-typing | Optional. Free text allowed. |
House Number | Enter house number. | Free-typing | Optional. Free text allowed. |
Apartment | Enter apartment/unit name. | Free-typing | Optional. Free text allowed. |
Click Create to confirm or Back to discard the changes.
Once the account is created, it will appear in the All Accounts list.
From the three-dot menu, you can choose to Edit or Delete the account.
3. Create a Company Account
A specific Entity Account designed to manage PROP or OMNIBUS portfolios.
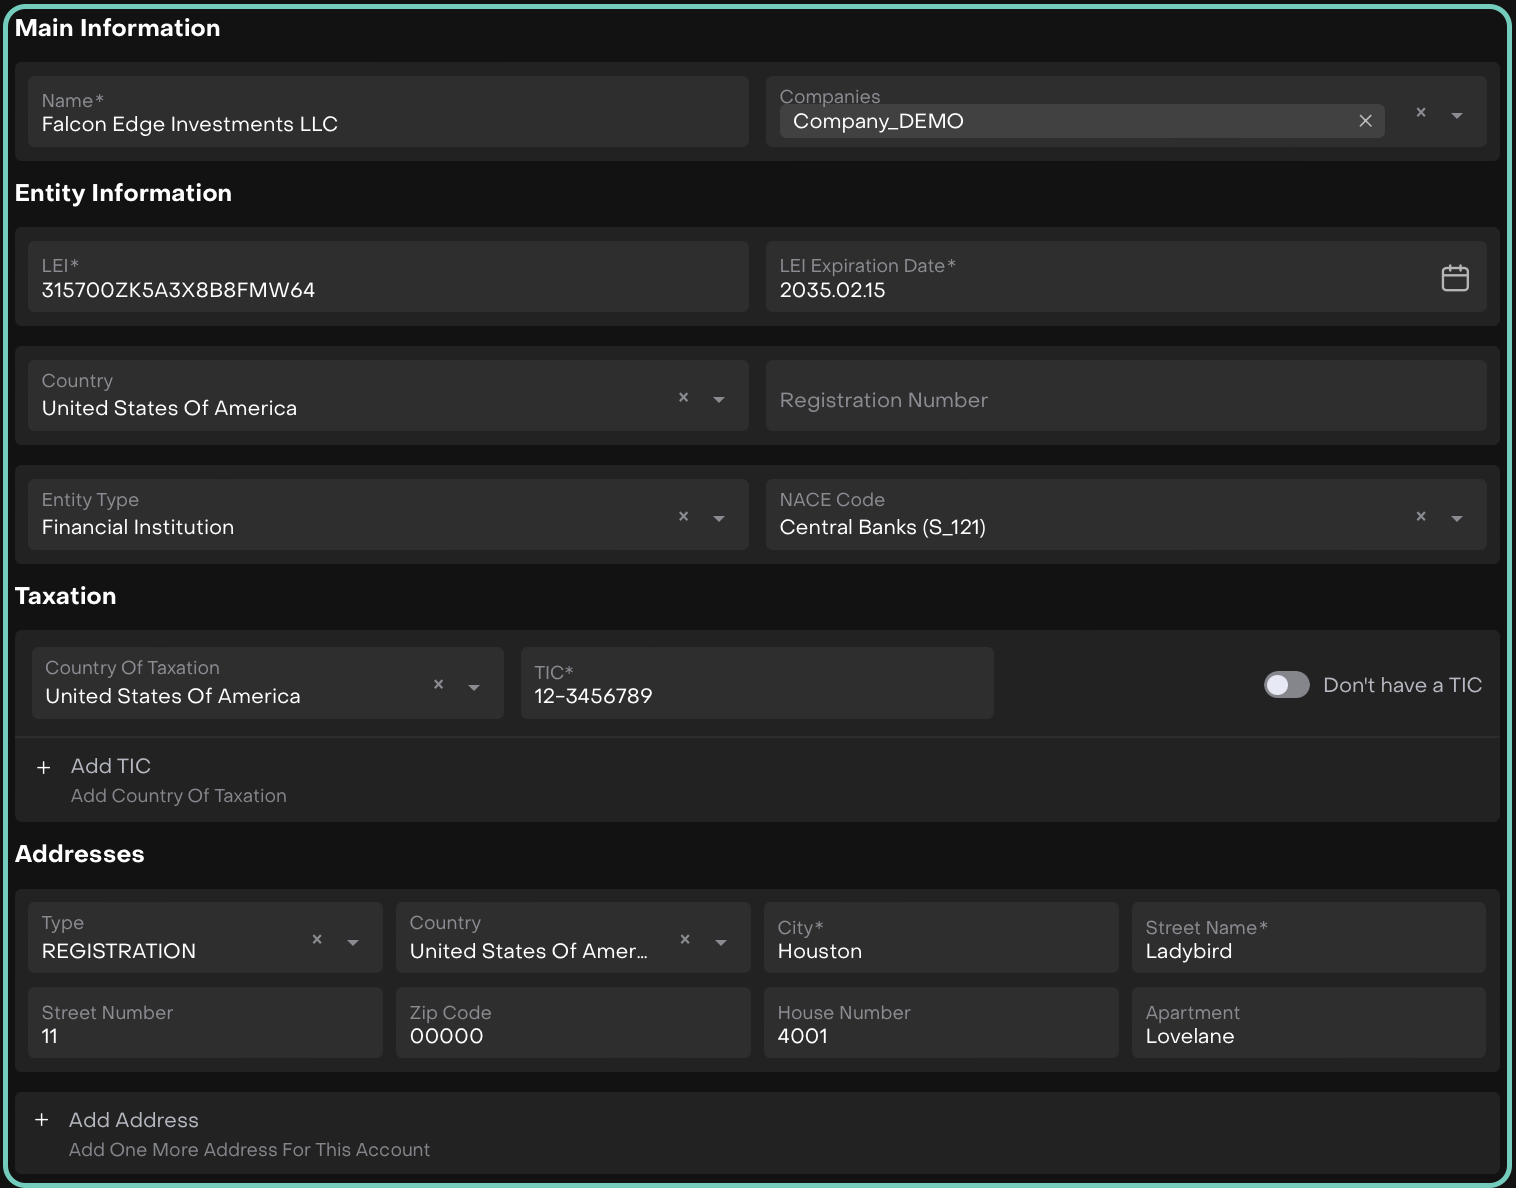
A form opens, where you need to fill in the required details (see the field reference table below).
Field Name | Definition / What to Fill In | Field Type | Validation / Rules |
|---|---|---|---|
Main Information | |||
Name (*) | Enter the Entity Account name. | Free-typing | Free text allowed. |
Companies (*) | Select the company to which this account is linked. | Dropdown (Companies list) | Must be chosen from the Companies list. |
Entity Information | |||
LEI (*) | Enter the Legal Entity Identifier (20-character alphanumeric code). | Free-typing | Letters and numbers only. Must follow LEI format. |
LEI Expiration Date (*) | Enter the expiration date of the LEI. | Date Selector | Must be a valid future date. |
Country (*) | Select the country where the entity is registered. | Dropdown (Countries list) | Must be selected from Countries list. |
Registration Number | Enter the official company registration number. | Free-typing | Optional. Letters and numbers only. |
Entity Type | Select the classification of the entity. | Dropdown (Single Choice) | Options & When to Choose:
|
NACE Code | Select the entity’s NACE classification. | Dropdown (Single Choice) | Options are:
|
Taxation | |||
Country of Taxation (*) | Select the taxation country. | Dropdown (Countries list) | Must exist in Countries list. |
TIC | Tax Identification Code. | Free-typing (active if toggle ON) | Mandatory if toggle ON. Optional if toggle OFF. |
Addresses | |||
Type (*) | Select address type. | Dropdown | Options are:
|
Country (*) | Select address country. | Dropdown (Countries list) | Must exist in Countries list. |
City (*) | Enter city name. | Free-typing | Free text allowed. |
Street Name (*) | Enter street name. | Free-typing | Free text allowed. |
Street Number | Enter street number. | Free-typing | Optional. Free text allowed. |
Zip Code | Enter postal/zip code. | Free-typing | Optional. Free text allowed. |
House Number | Enter house number. | Free-typing | Optional. Free text allowed. |
Apartment | Enter apartment/unit name. | Free-typing | Optional. Free text allowed. |
Once all fields are filled, click Create to save the account.
Post creation, the account appears on the list. Use the three dots to Edit/Delete the entry.

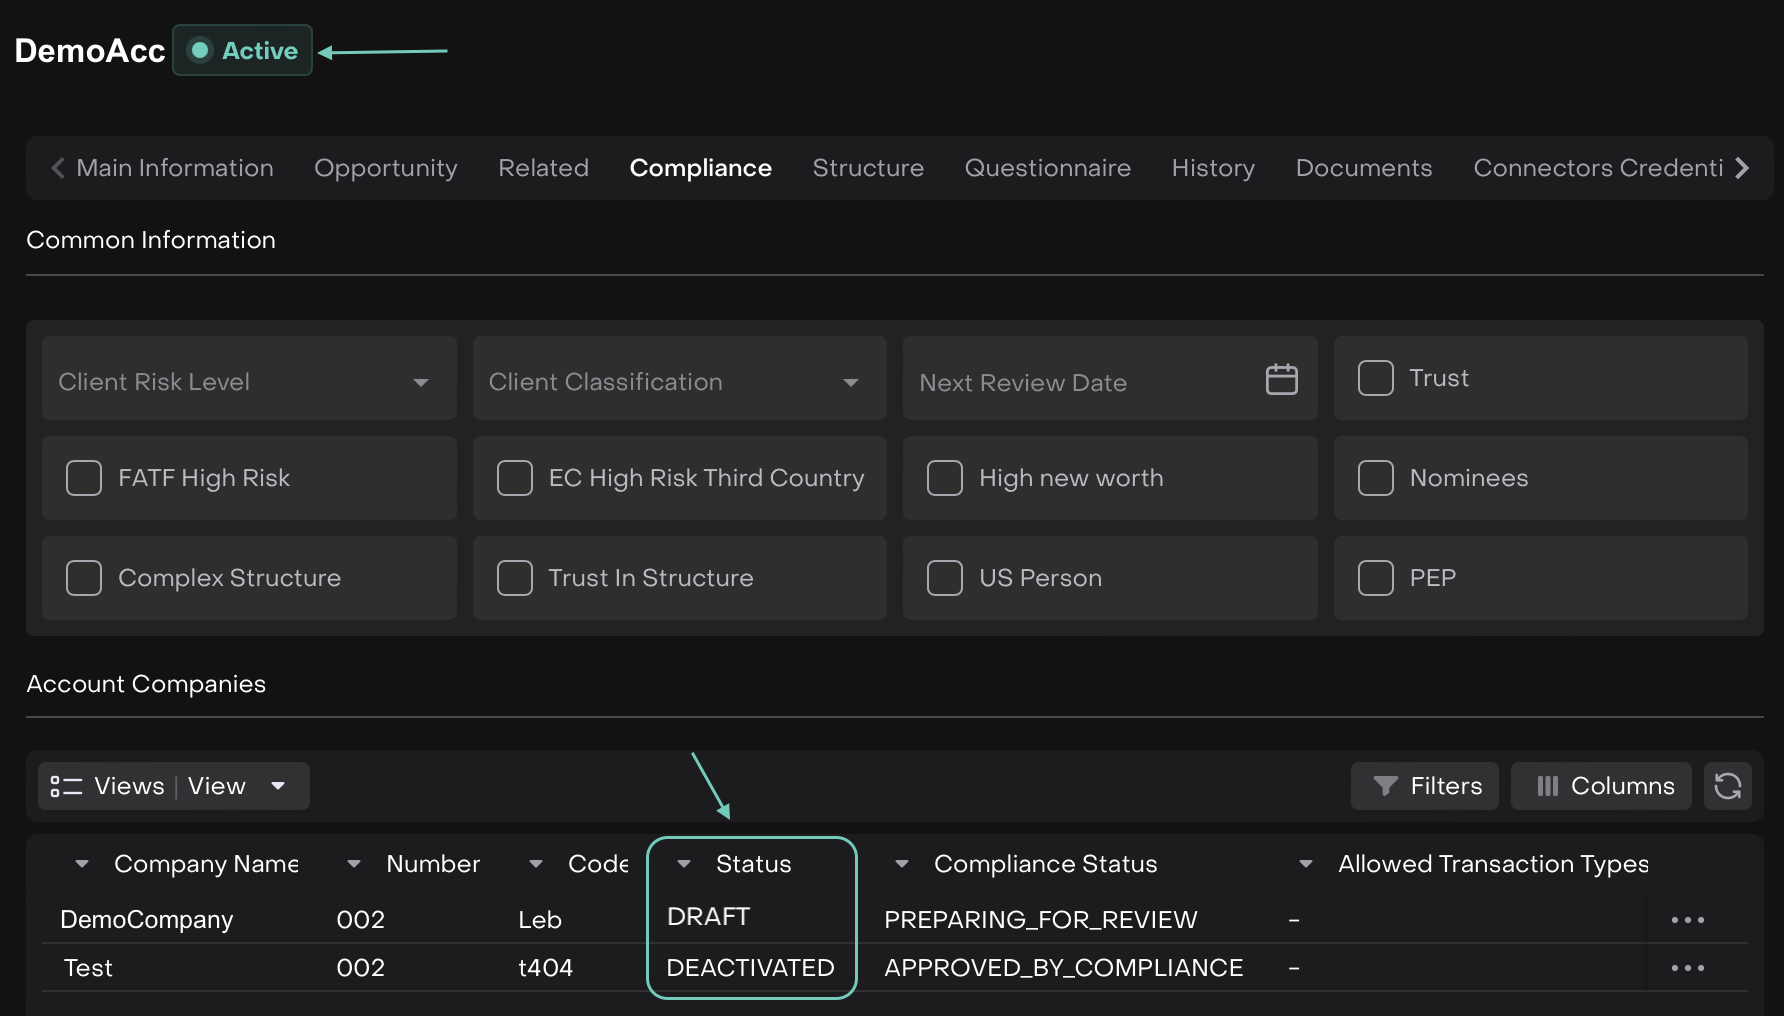
Account Deactivation
An account can be automatically deactivated based on the status of its Account Companies in the Compliance tab.
How Deactivation Works:
Navigate to Compliance tab > Account Companies section.
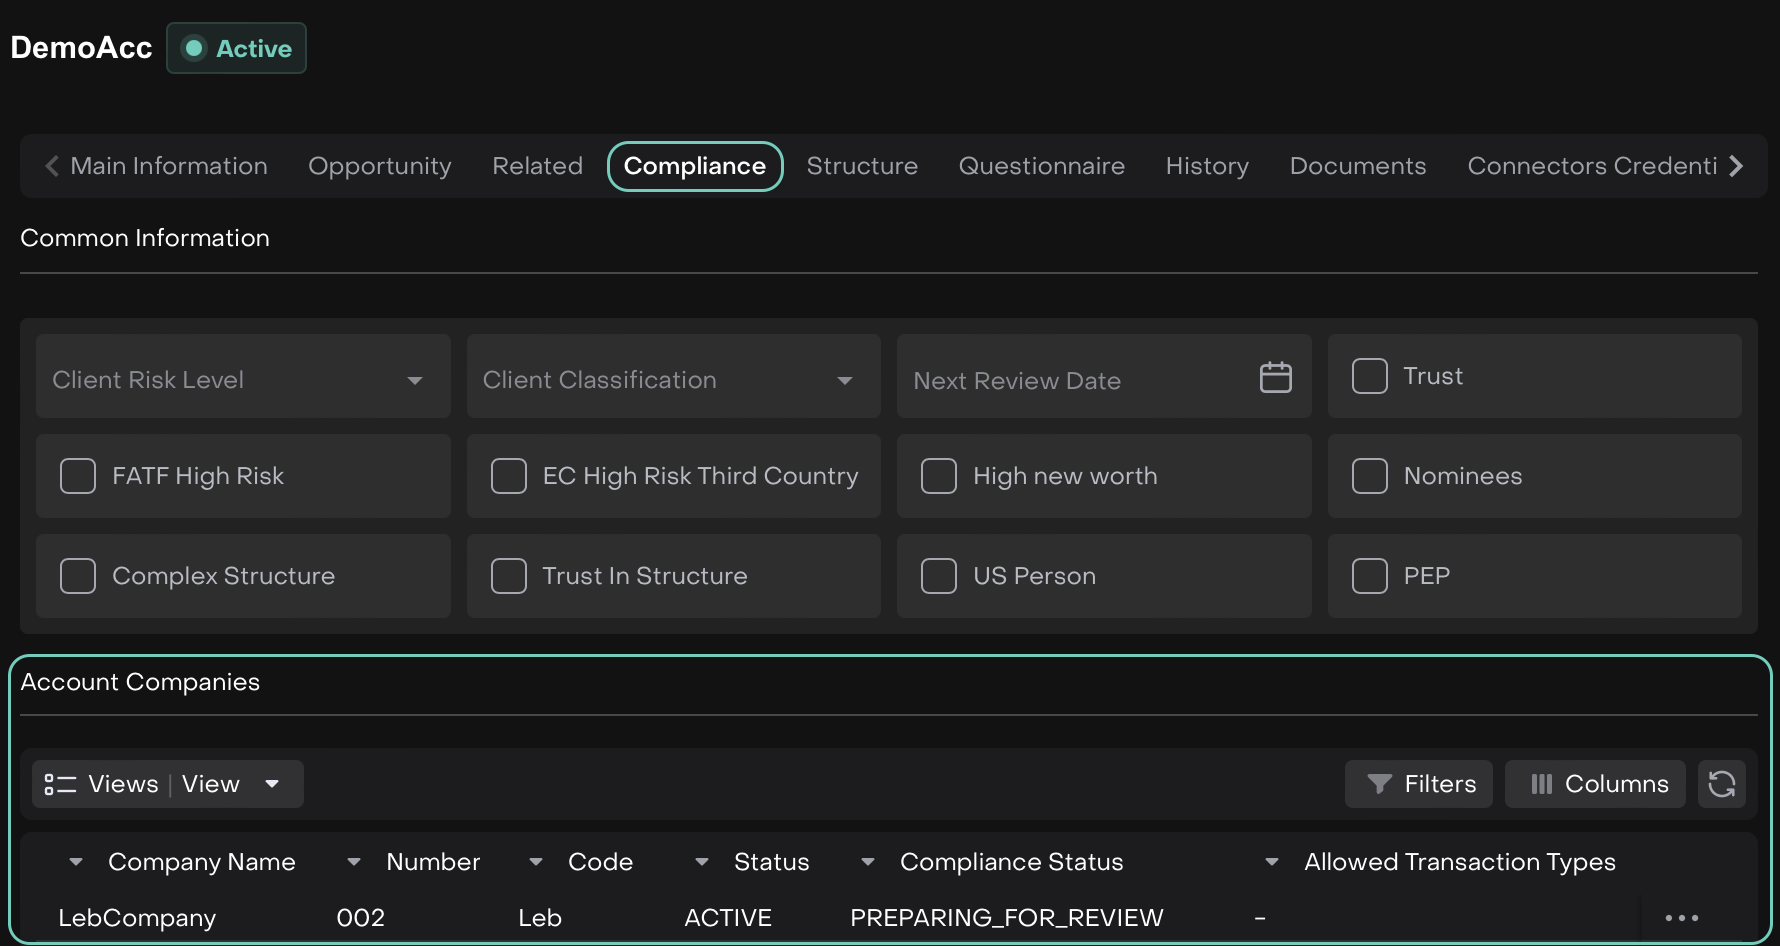
Check the status of the Account Companies linked to the Account.
The Account status updates automatically based on these rules:
If all Account Companies are in Closed/Deactivated status → the Account is automatically Deactivated.
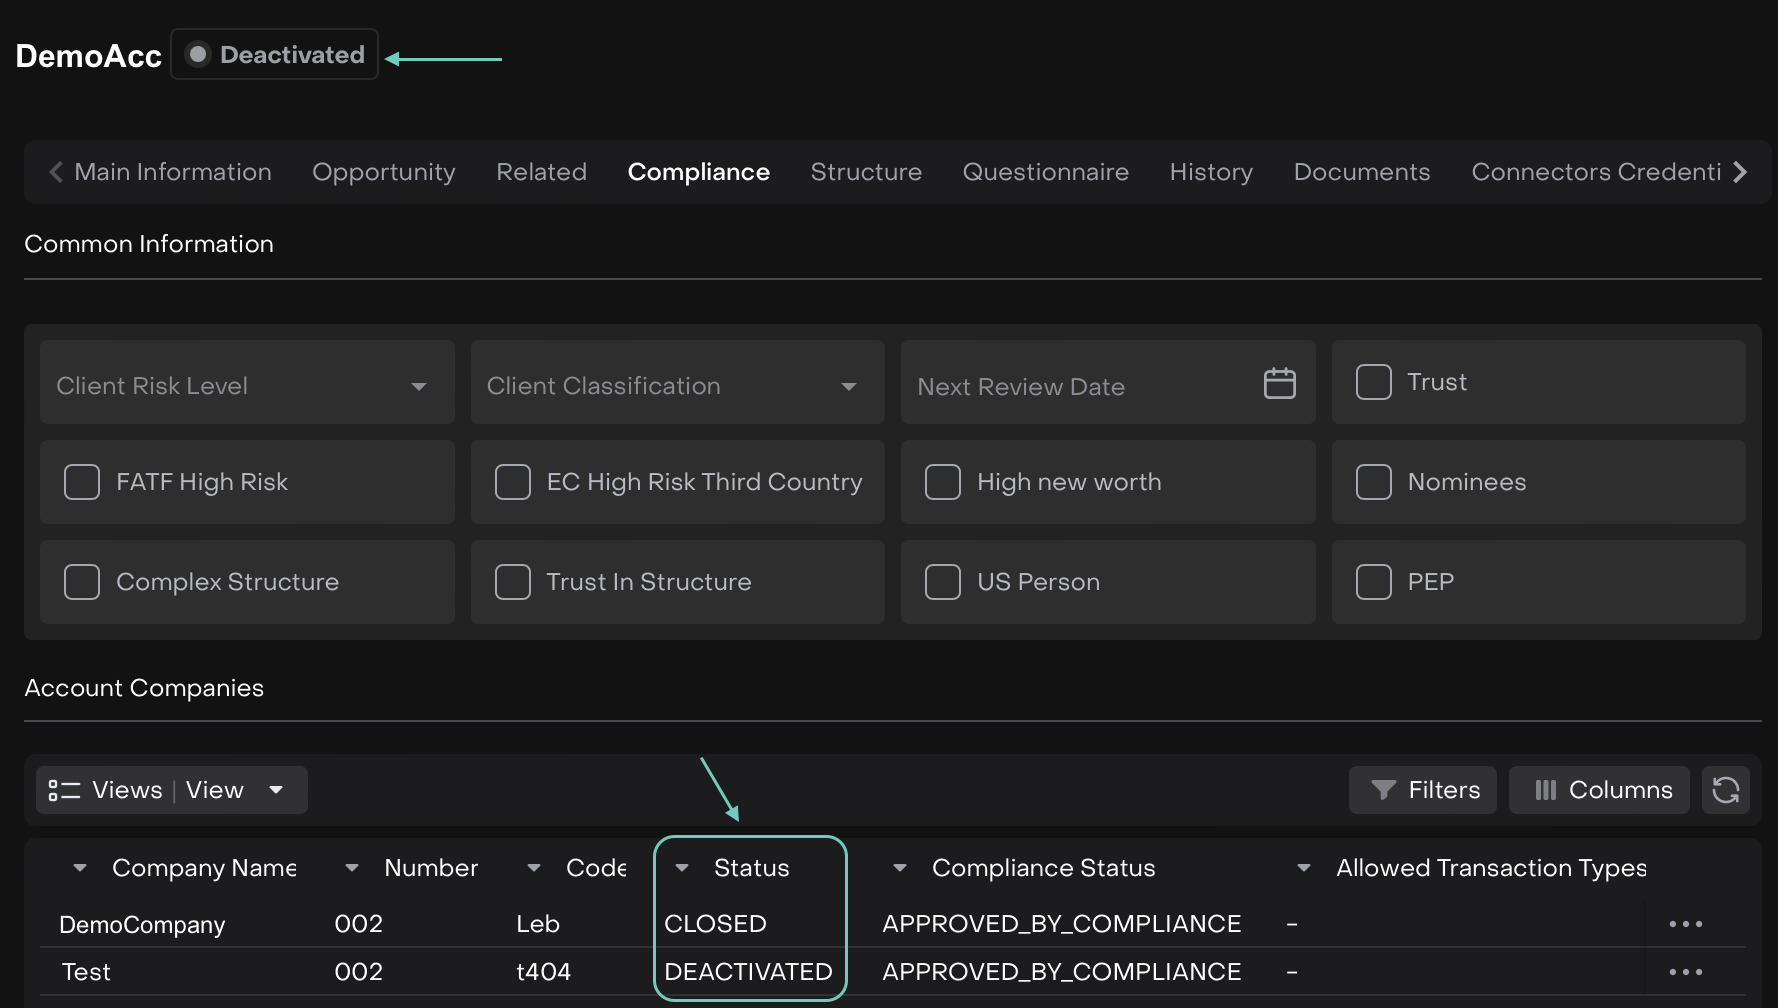
Active – Company is active and keeps the Account active.
Draft – Company setup in progress; Account remains active.
Closed – Company is closed; contributes to Account deactivation if no active/draft remain.
Deactivated – Company is deactivated; contributes to Account deactivation if no active/draft remain.
Accounts cannot stay active without at least one associated Account Company in Active/Draft status.
If at least one Account Company is in Active/Draft status → the Account remains Active.