Set Up Authorized Person Access
AVAILABLE IN: 

Introduction
Granting clients access to the platform is a carefully managed process designed to ensure the right people can view or take action only where appropriate.
On the platform, a client’s access is always managed through either:
Contact – A client linked to an Account, but cannot see any information unless they are added as an authorized person.
Authorized Person – A client officially designated in a Mandate to act on behalf of the primary account holder. This role allows them to view, place, or modify orders, depending on the access rights assigned.
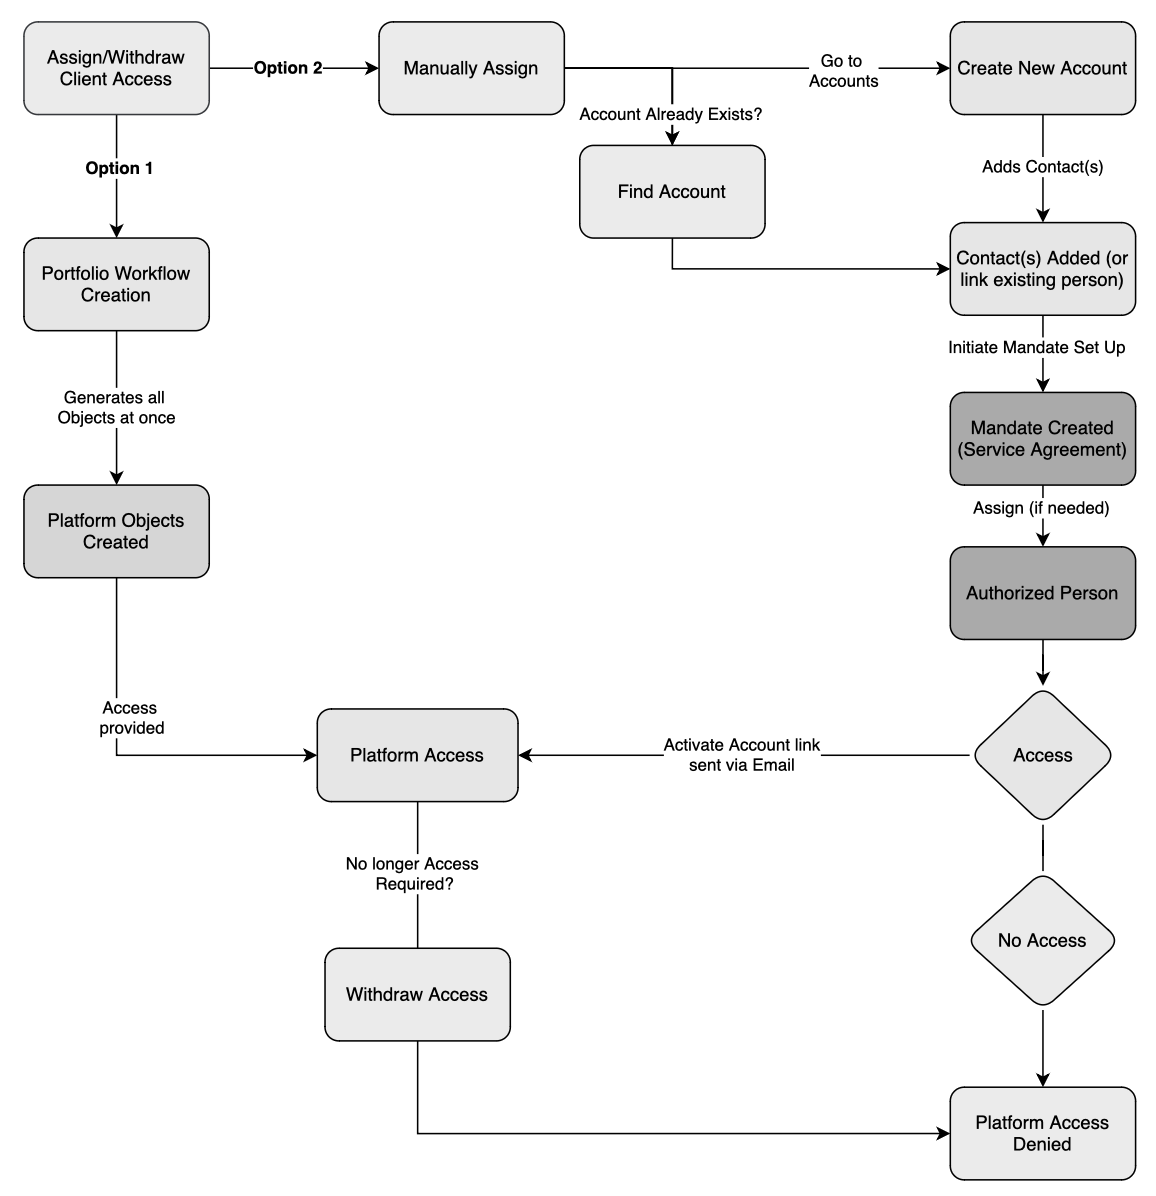
The platform supports two distinct methods for assigning or withdrawing client access, each suited to different operational needs. The flowchart outlines the two access methods.
These roles help define what each person can see or do, based on how they’re linked to specific Accounts or Portfolios.
Key Terminologies
Before assigning access, it's essential to understand which platform objects work together:
Terms (A-Z) | Description |
|---|---|
Account | Holds Client details and connections to Mandates and Contacts. |
Authorized Person | A Client assigned to a Mandate who can view, modify, or execute orders. |
Contact | A Client added to an Account via the "Contacts" tab. |
Client | An individual or entity stored in the platform, linked to one or more Accounts. |
Mandate | Agreement that defines service type and access rights. Links Authorized Persons. |
👉 New to some terms? Check out full Glossary for quick descriptions.
This guide explains how to assign a Client to a Portfolio, with or without platform access and how to withdraw access when needed.
Permission Requirements
Make sure you have the correct permissions to manage access. If not, contact your Business Admin.
Permission ID | Permissions |
|---|---|
Accounts | View, Modify, Create, Delete |
Mandates | View, Modify, Create, Delete |
Compliance company | View, Modify, Create, Delete |
Activation Link & Client Login
When an Authorized Person is granted platform access, they will automatically receive an activation link via email.
The link is valid for 7 days. Make sure to log in before it expires to activate the account.
Two Ways to Assign or Withdraw Client Access
There are two main methods to give a Client access to the platform.
Option 1: Automated Creation via Client Portfolio Workflow
Clients can be created automatically through the Client Portfolio creation workflow.
This method links all key objects such as mandates, authorized persons and more during setup.
👉 Learn more: Client Portfolio Creation Workflow
Option 2: Manual Creation via Account
Clients can be created manually by going to an existing Account and adding their details under the "Contacts" tab.
When a Client is not a Contact on an Account, they will not appear in the list of Clients on a Portfolio.
This is a direct method, but not part of the automated workflow.
How to Withdraw Access
To remove a Client's access:
From Account > Contacts tab
Remove the Client or toggle off platform access
From Mandate > Authorized Persons
Set Platform Access to
No AccessRemove the Authorized Person if needed
Can create all objects manually
Option 2 in Detail: Manual Access Management
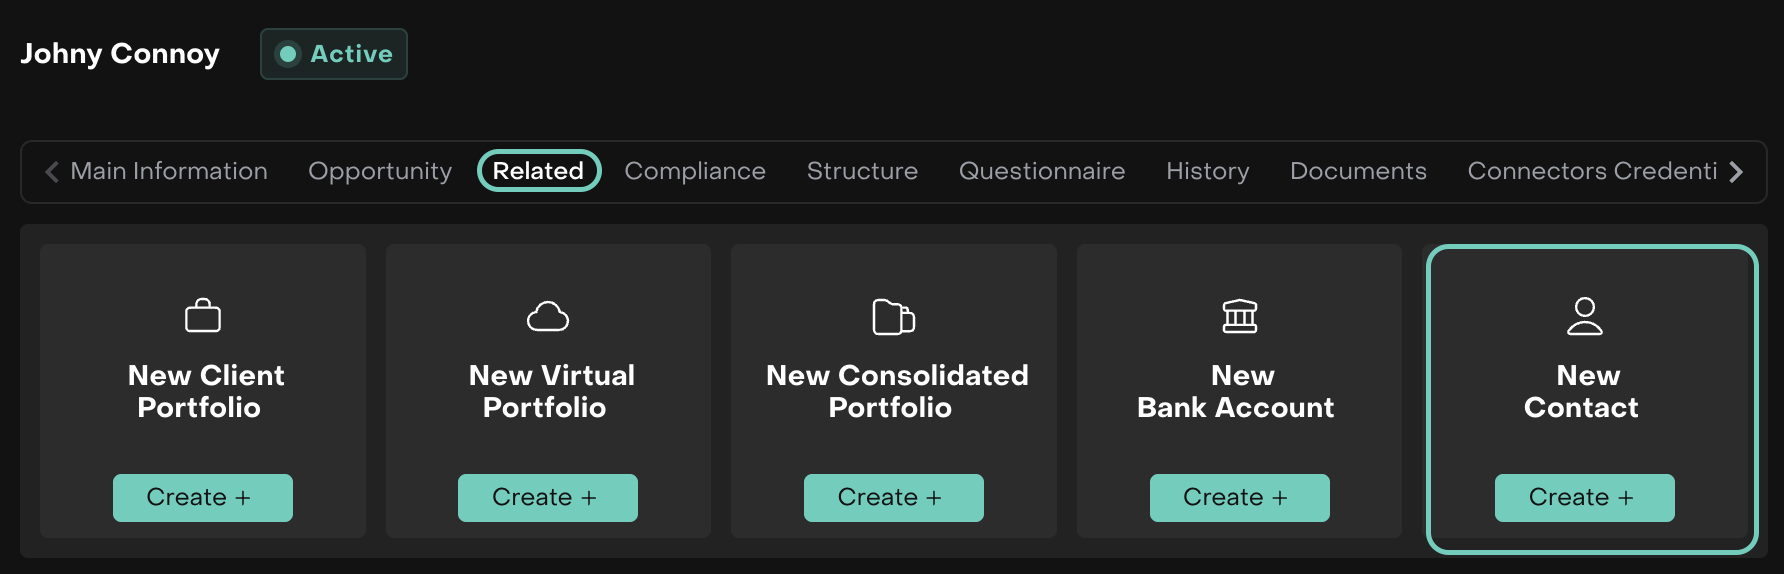
How to Manage Contact on an Account
Go to Accounts > Select Account
Find Related tab > New Contacts
Click the “Create +” button to add a new Contact.
Option A: Create a New Client
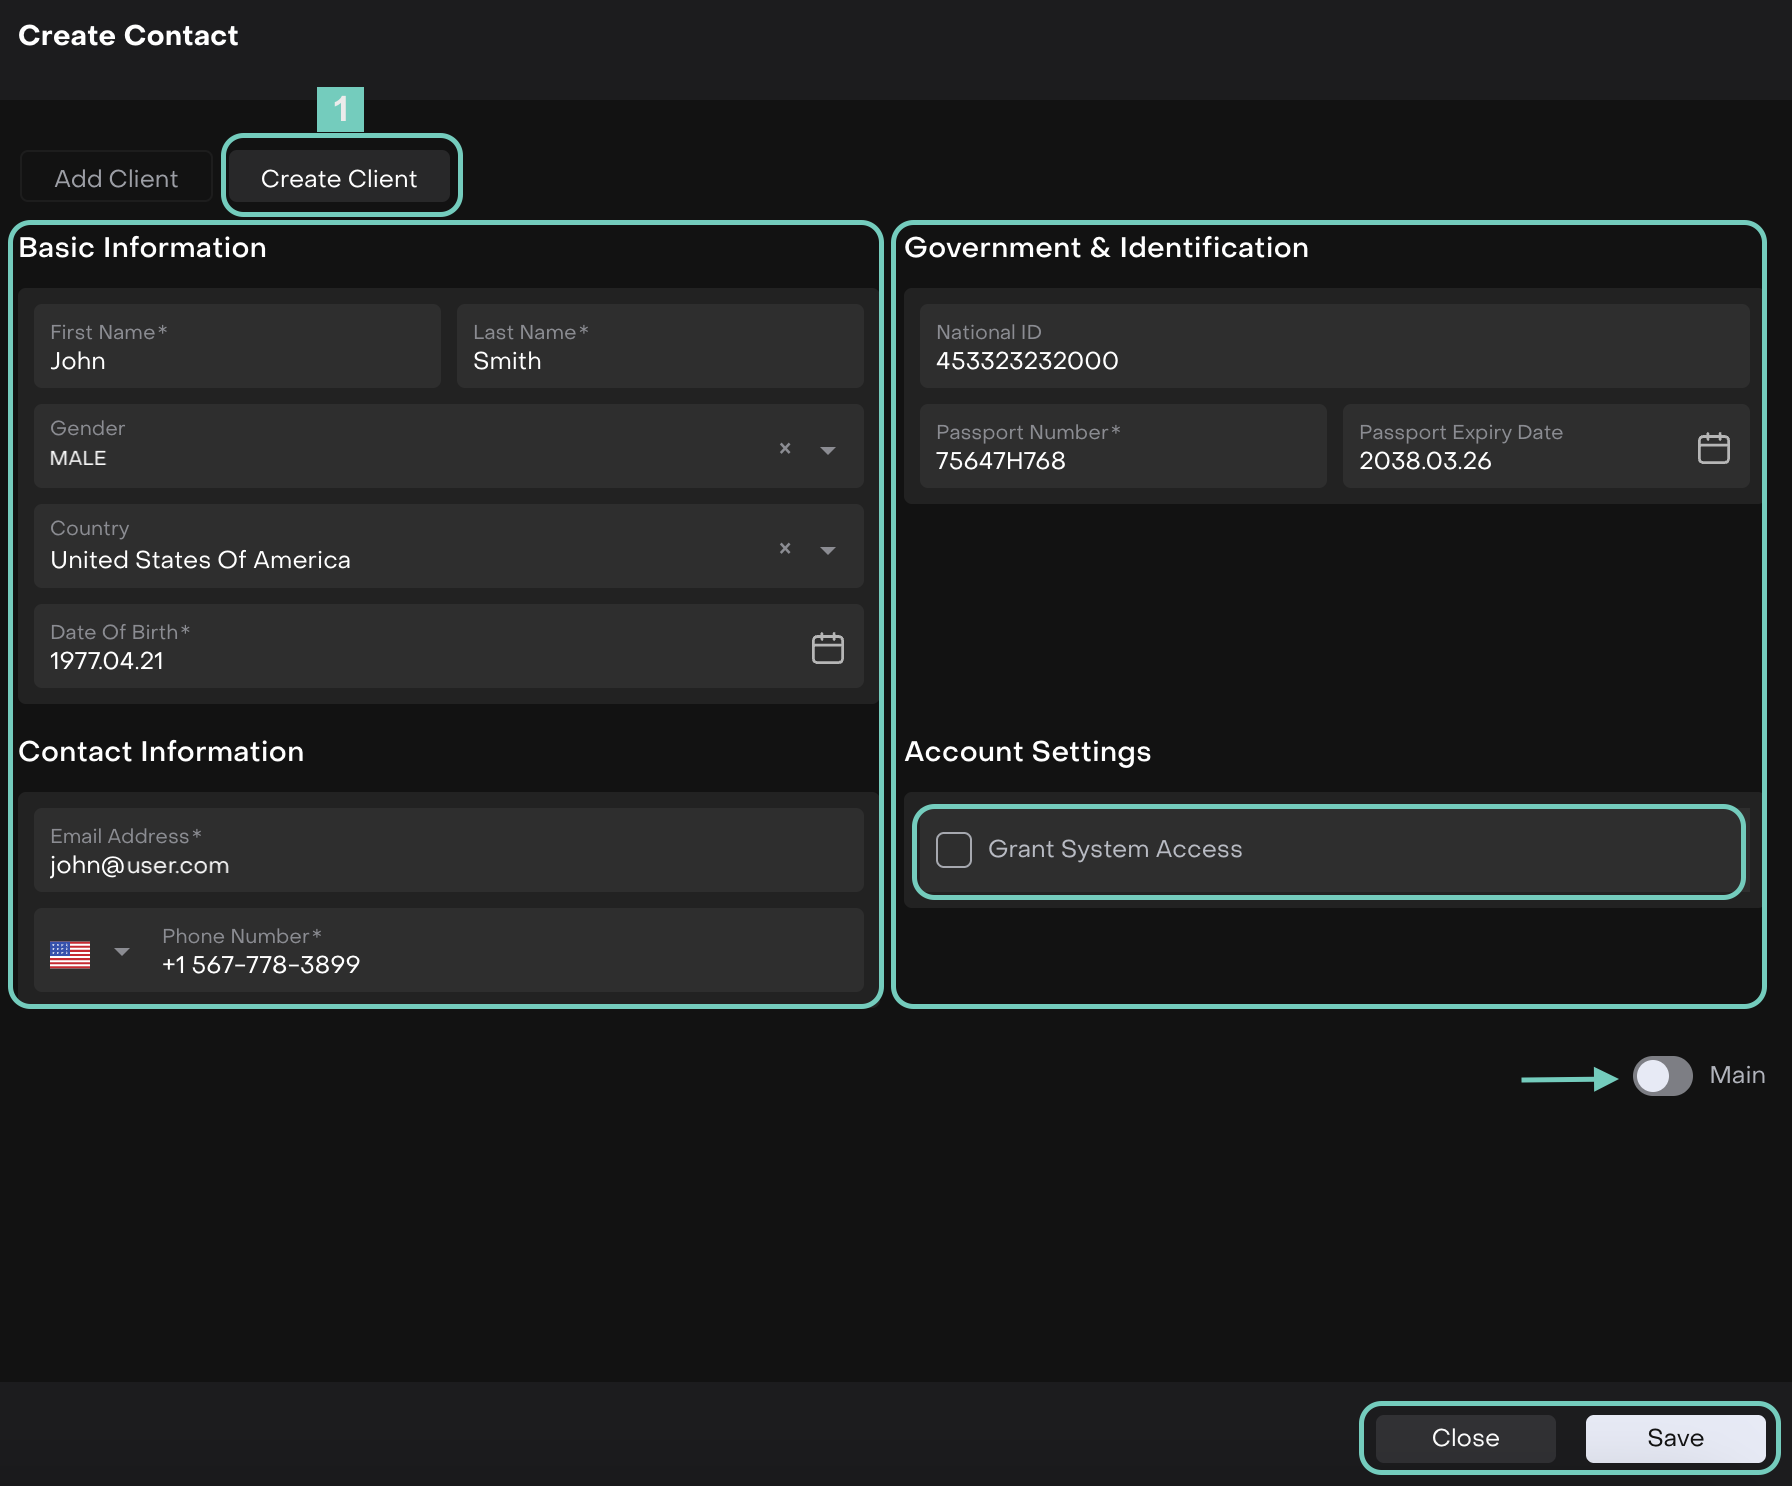
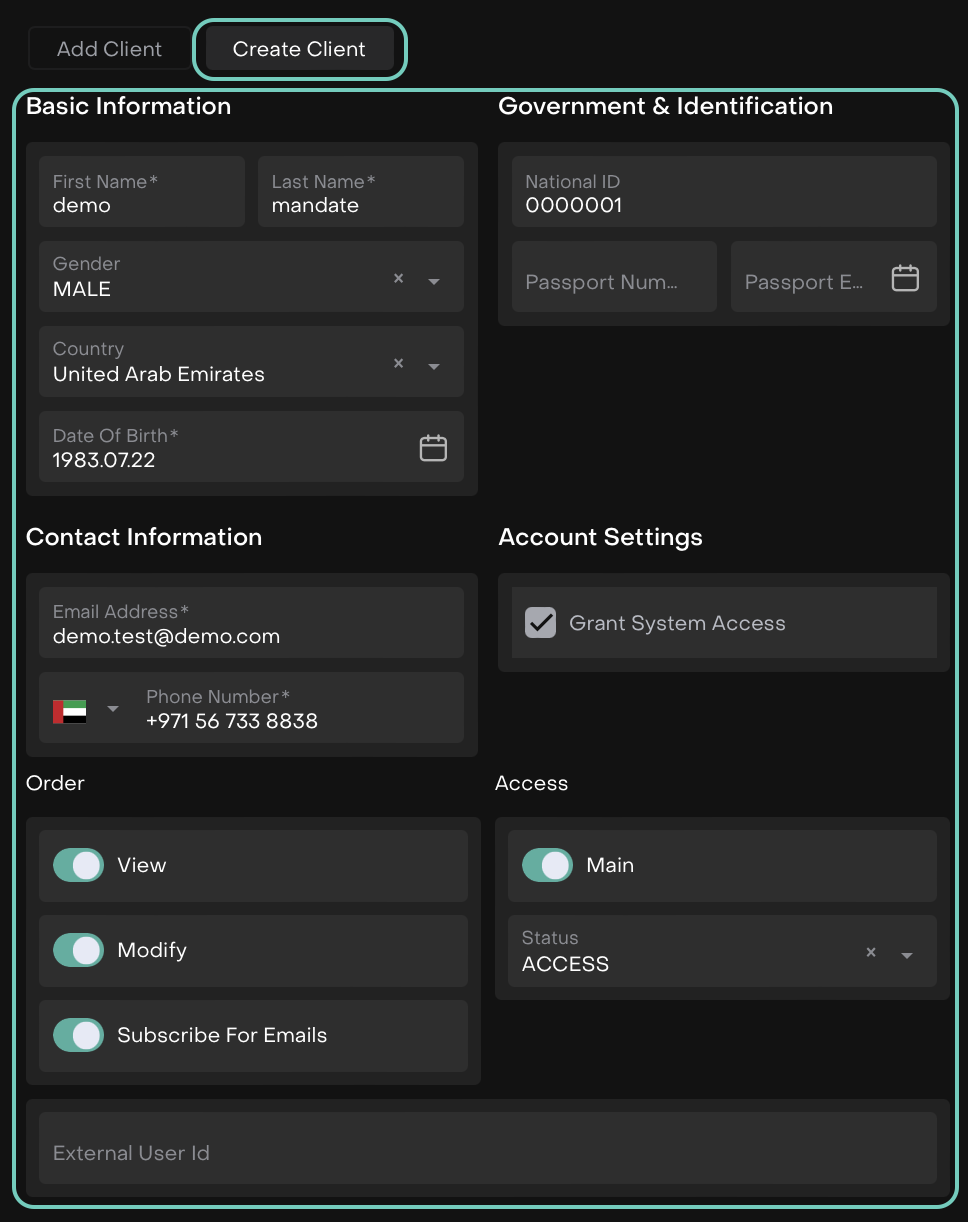
Select “Create Client”.
Fill in all required fields:
First Name, Last Name
Birth Date (Must be less than today (no future date allowed), Email
Country, Passport Number
Gender, Phone Number (with Country Code)
Enable “Grant System Access” if required.
Toggle “Main” ON if applicable.
Click Save or Close.
Option B: Add Existing Client
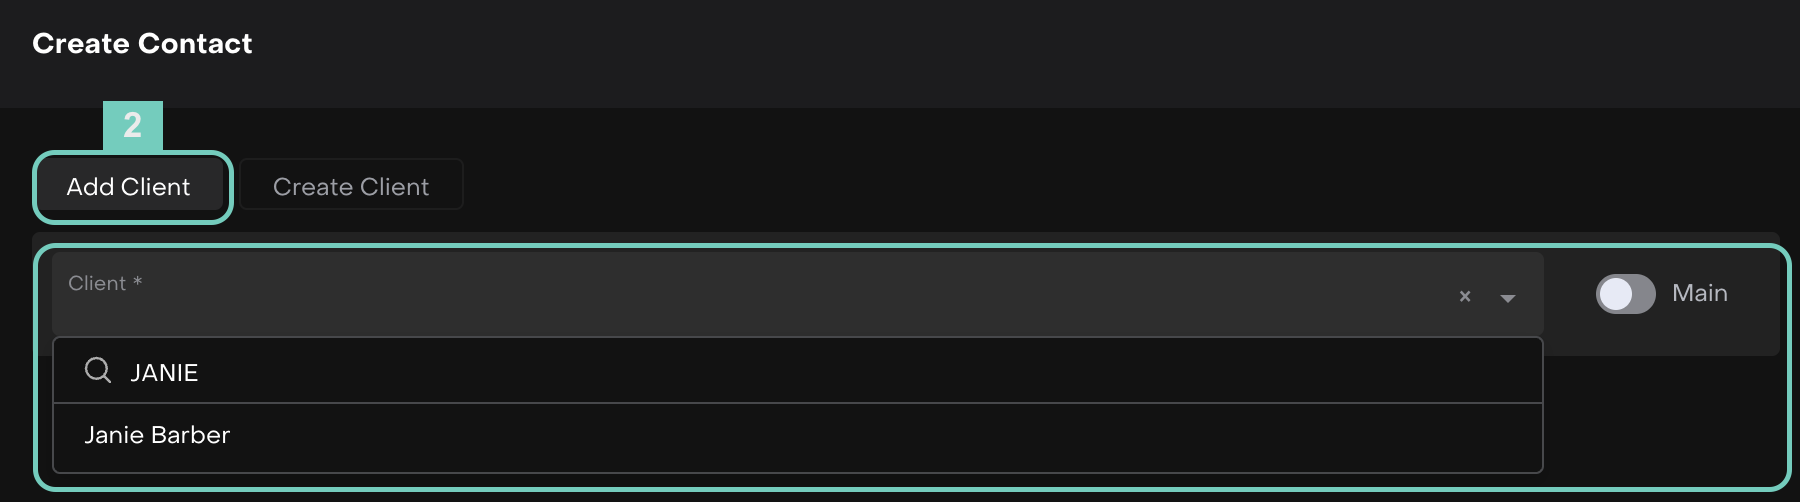
Select “Add Client”.
Search for the existing Client.
Toggle “Main” ON if this is the primary contact.
Click Save or Close.
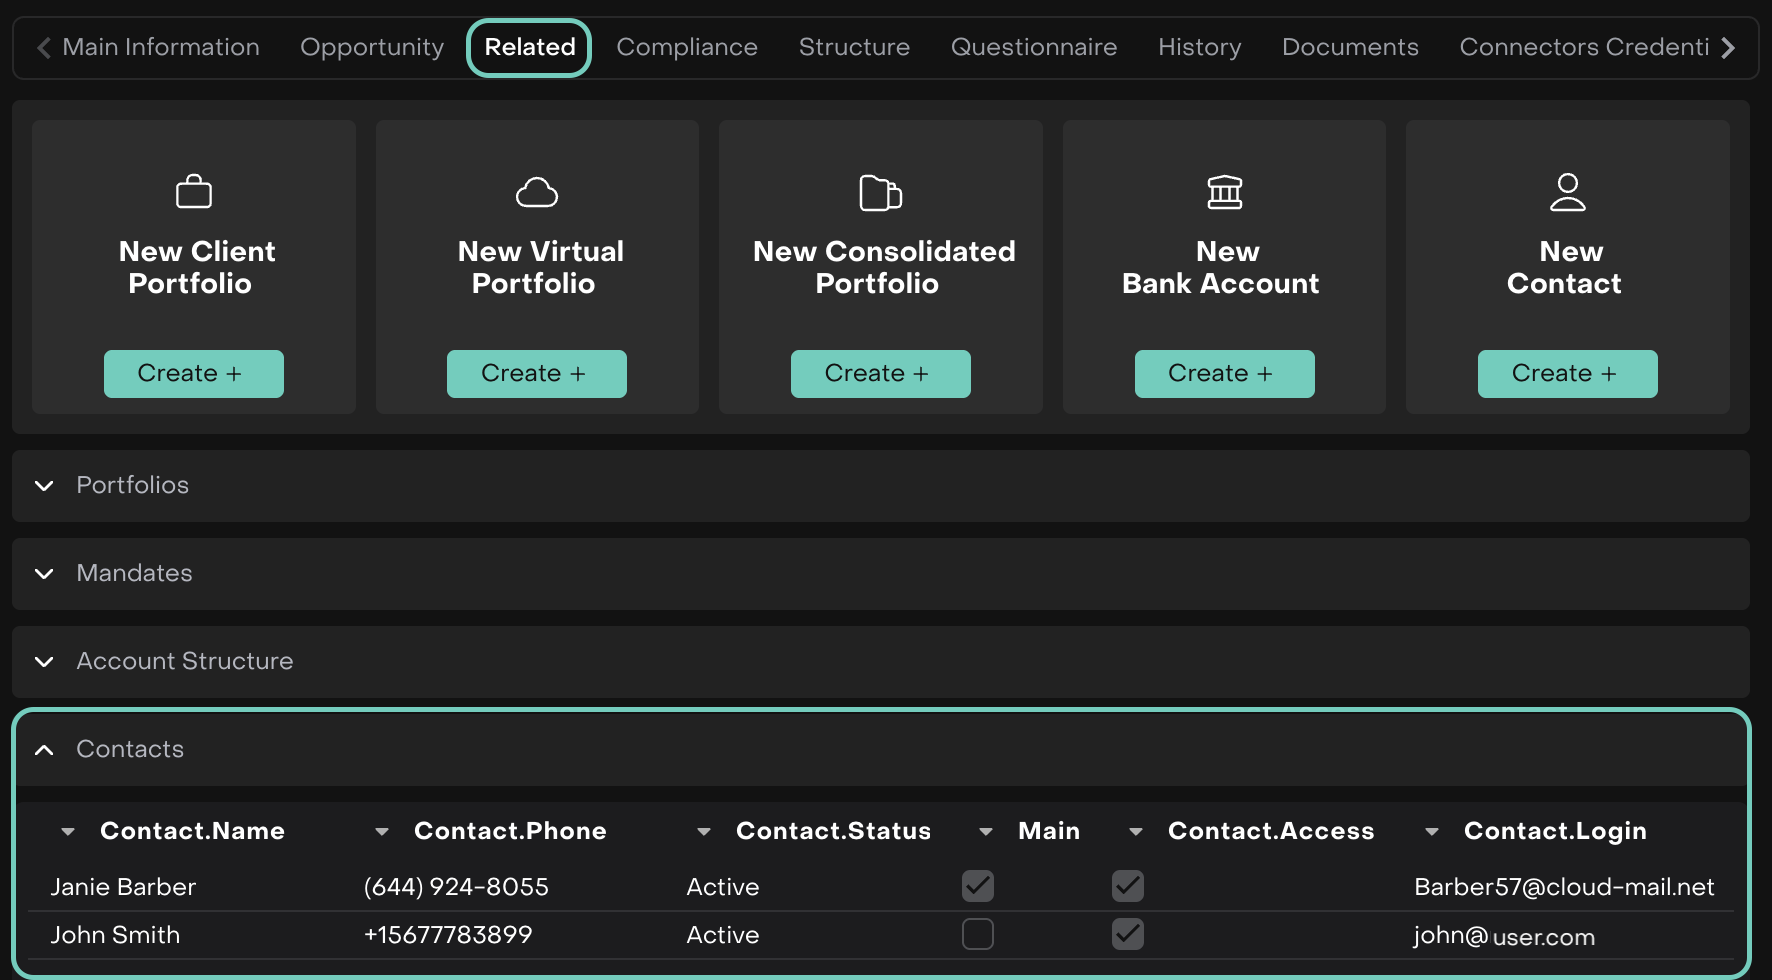
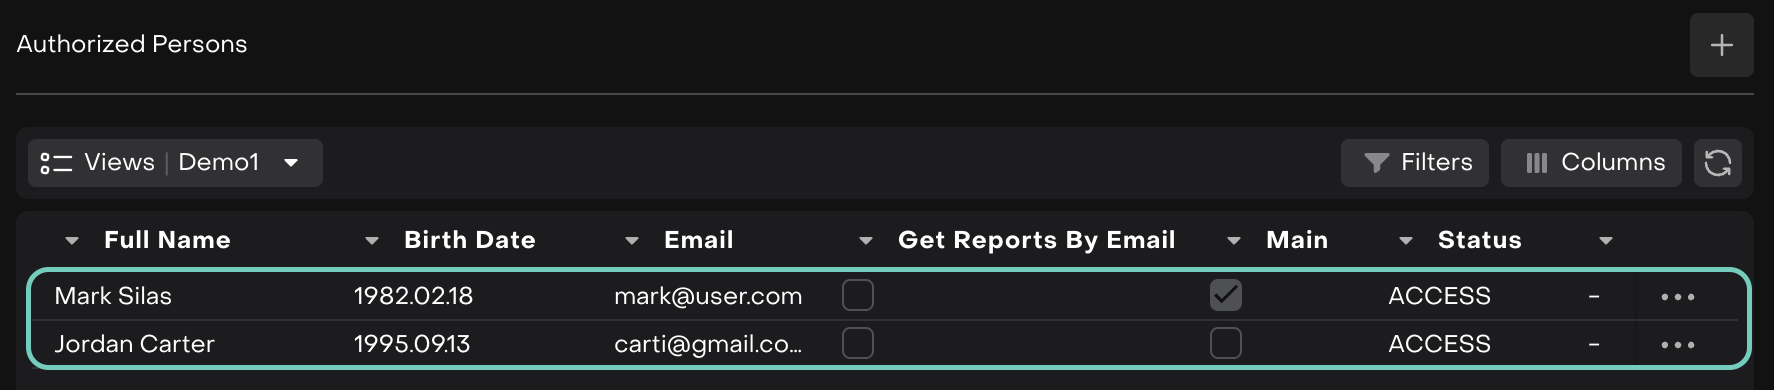
The Client(s) are now listed as a Contact on the Account, as shown here.
Find it under Related > Contacts tab.
Manage Authorized Persons via Mandates
A Mandate is a formal agreement associated with an Account that defines:
Contract terms
Fee structures
Who is authorized to act on the Account
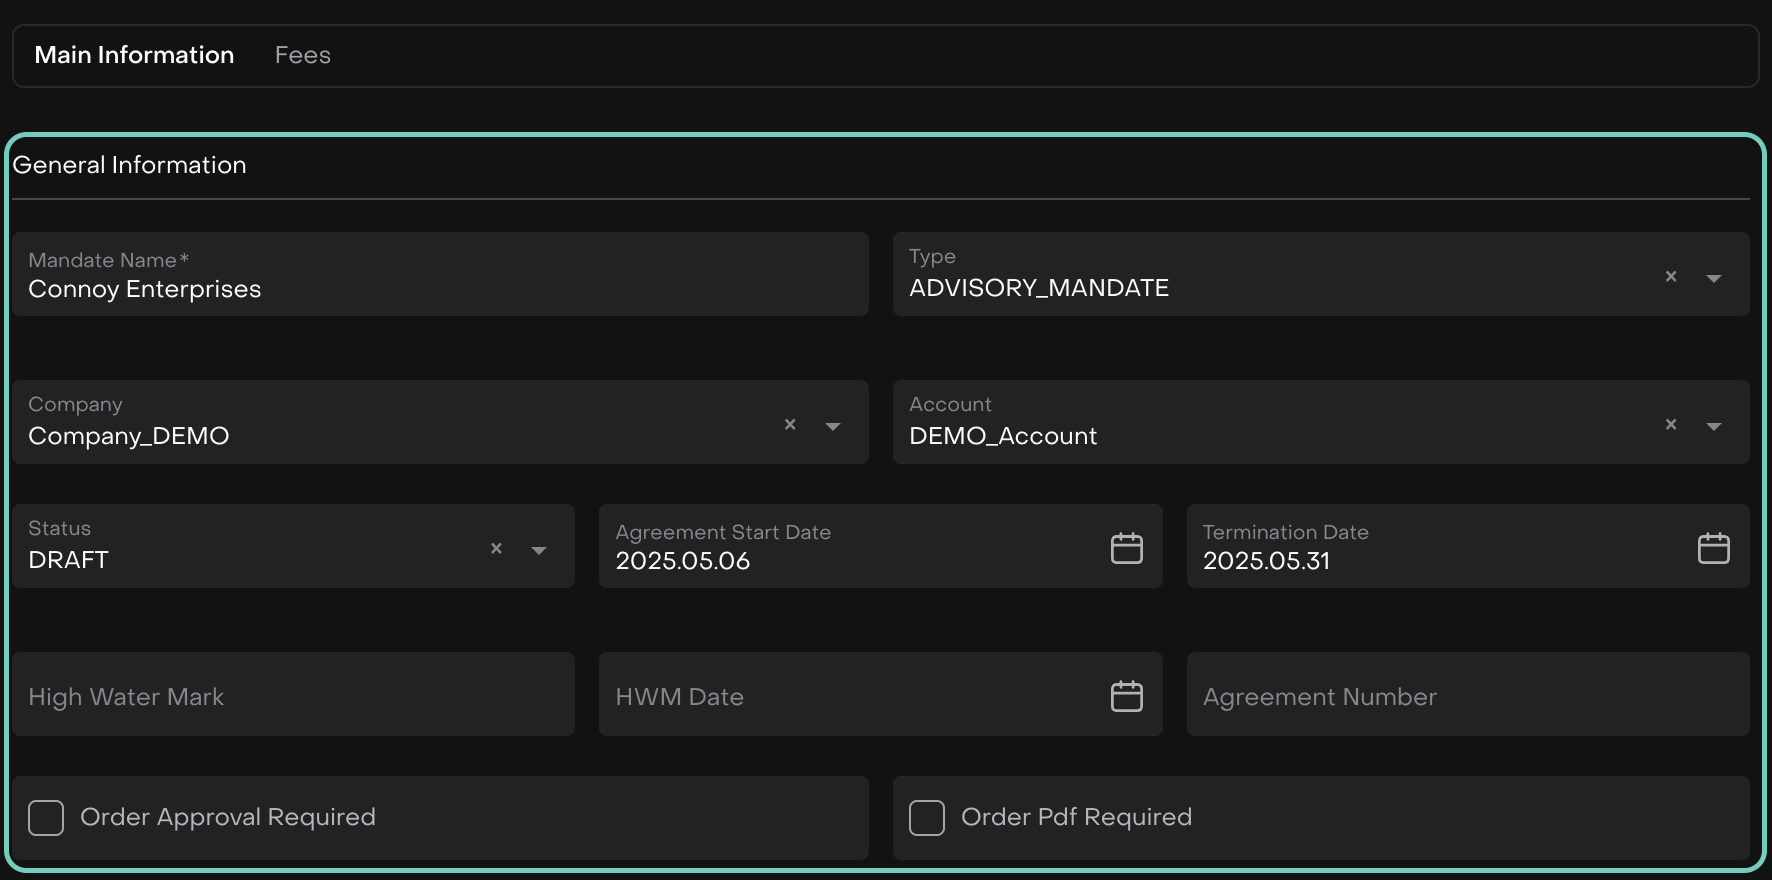
How to Create a New Mandate
Go to Accounts > Find Mandates tab.
Click the “+” button.

Enter the Mandate Name.
Choose the Mandate Type, find the details below.
Choose the Company and Account it belongs to and fill in required fields (marked with *).
👉 Learn more here.
The platform provides the following status of mandates:
Status | What it Means? |
Draft | The contract is not signed. |
In Approval Process | Contract under review. |
Activated | The contract is valid. |
Terminated | If the mandate is Terminated, it is required to specify the termination date. |
Now, proceed to add Authorized Persons.
Manage Authorized Persons
In the Authorized Persons section (on Mandates), click the “+” icon.

Choose to Add Existing Client or Create New.
Creating New Client
Fill in the required fields (same as for Contacts).
Order Access Levels:
View – Client can see orders but not modify them.
Modify – Client can create, update, or cancel orders or,
Subscribe For Emails
Tick Yes/No to Grant System Access
Main – Toggle “On” to mark as primary Authorized Person.
Set Status to Access or No Access to control platform login.
Click Save.

Selecting from Existing
Search name by the first/last name.
Order Access Levels:
View – Client can see orders but not modify them.
Modify – Client can create, update, or cancel orders.
Subscribe For Emails
Main – Toggle “On” to mark as primary Authorized Person.
Set Status to Access or No Access to control platform login.
Click Save.
Now, the Authorized Person is linked to the Mandate.