
Import Transactions Manually
Introduction
Manual import of transactions refers to uploading or entering transaction data into the Platform manually, rather than using automated process. The Reluna platform allows you to upload one or multiple transactions at once, which are then automatically linked with Bank Accounts and Portfolios.
This feature is particularly useful when:
Transaction data is not automatically captured by the Platform.
Working with data from external sources that are not integrated with the Platform.
Key Terminologies
Term (A-Z) | Definition |
|---|---|
CSV File | A text file in a specific format that stores data in a table-like structure. Manual Import accepts semicolon-separated values (.csv) files. |
Import File | Action in the platform to upload a CSV file with transaction data into the system. |
Manual Import | Process of entering or uploading transactions into the Platform manually rather than through automated integration. |
Pre-Filled Template | CSV template with sample data to guide users in formatting transaction data correctly. |
Template | Predefined CSV structure used for manual import of transactions. |
XLS File | A spreadsheet file format created by Microsoft Excel (.xls). If used for manual import, it must be saved/exported as a CSV file before uploading to the platform. |
👉 New to some terms? Check our full Platform Glossary for quick definitions.
Permission Requirements
Platform Name | Permission ID | Permission Level |
|---|---|---|
Transactions | Transactions | View, Modify, Create |
Import | Manual import transactions | View, Modify, Create |
When to Use Manual Import
Manual import is typically used in two main scenarios:
Uploading historical transaction data to the Platform.
Uploading transactions when Bank Integration is not available for daily activity.
Transactions loaded via manual import participate in calculations after they receive particular status in the Platform.
Navigation to Import Tab
Manual import is available to authorized users via:
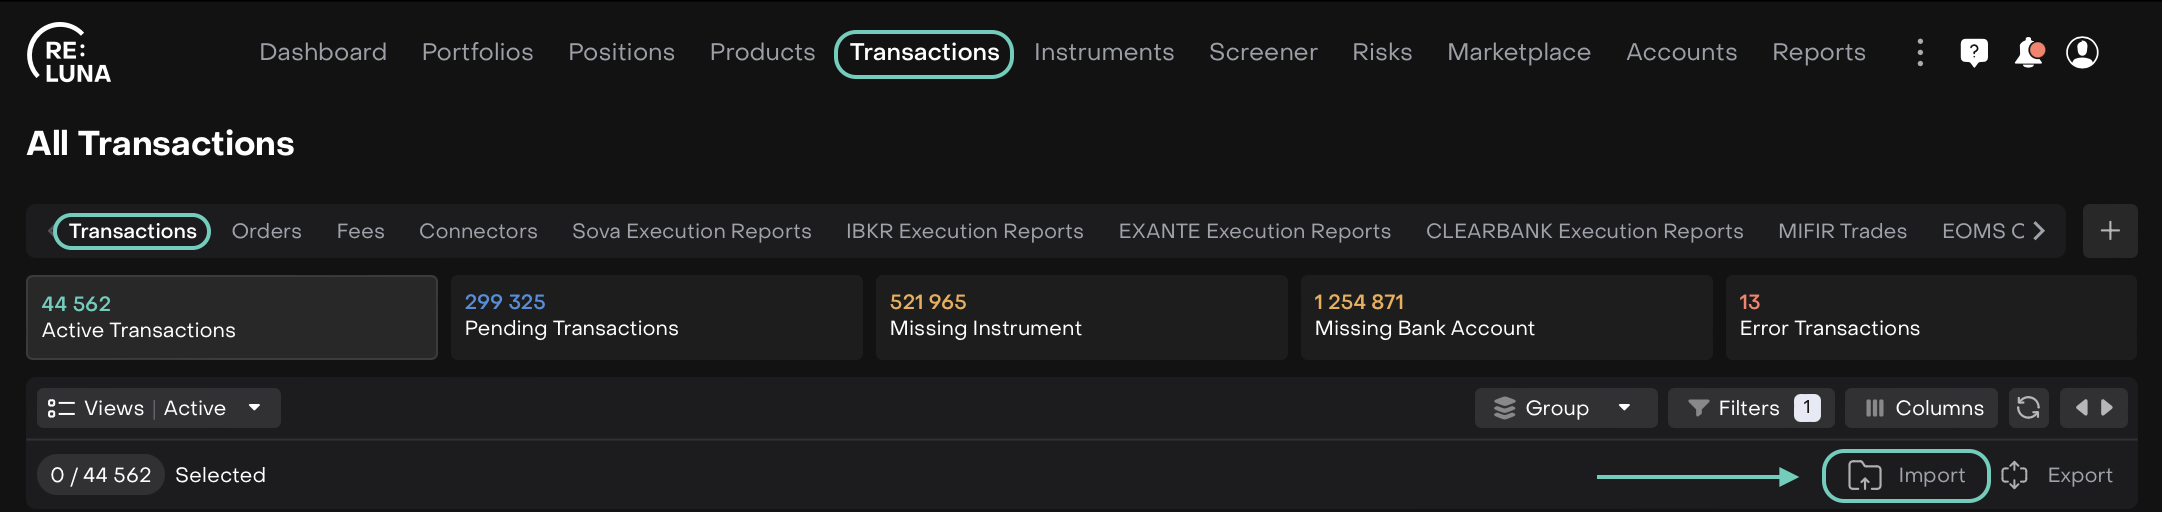
Transactions > All Transactions > Import
Or,
Dashboard > Import page

How to Manually Import Transactions
Click Import option to open the Manual Import window.
Navigate to the Transactions tab and click Import File.

A stepper based form opens.
Step 1: Select Type of Creation
You have two ways to begin the import process:
1. Download Template and Upload File
Click Download Template.
Fill out the transaction details in the provided
.xlsxor.csvtemplate file.Click Upload File to import the completed template back into the platform.
The CSV file template gets download on the PC/System; open/view/fill in the columns (in case of Empty Template) to further save and upload.
Once the file is loaded, you'll move to Step 2.
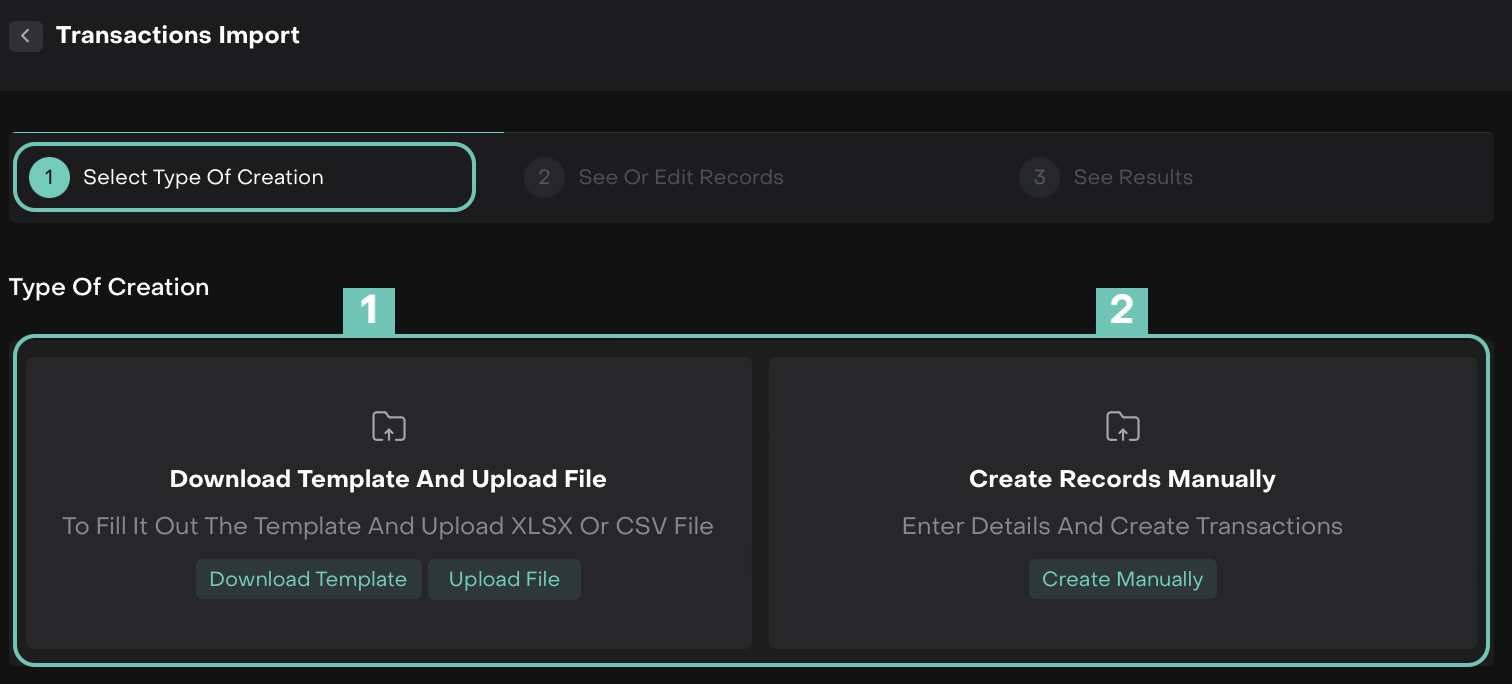
2. Create Records Manually
Click Create Manually and fill out all fields and press + icon.
Choose this if you want to input data one record at a time.
On its click, you'll directly move to Step 2.
Manual Transactions Import Template
Field Name | Description | Mandatory | Example |
|---|---|---|---|
Instrument identifier | External identifier of the instrument | Yes | US0378331005 |
type | Transaction type options:
| Yes | Buy |
subType | Transaction subtype | No | — |
Trade date | Transaction trade date | Yes | 2022.03.14 |
Trade Time (UTC) | Transaction trade time (UTC) | No | 11:03:52 |
valueDate | Transaction settlement date (YYYY.MM.DD) | Yes | 2022.03.15 |
qty | Quantity Amount of the security in case of security transaction Amount of the cash in case of the cash transaction
| Yes | 100000 |
price | Execution Price
For cash operations (i.e. Investment, Withdrawal, Fee) should be = 1 For Loan and Deposit operations should be = 100 | Yes | 0.1457896235 |
ccy | Price currency | Yes | EUR |
Payment Currency | Execution Currency (i.e. Buy security by EUR→ price currency = GBP, execution currency = EUR because money was charged in EUR | Yes | EUR |
Bank Account Internal Name | Client account number | Yes | DEMO1 |
Value | Operation amount before commission charges (absolute value) | — | 100000 |
Gross Amount | Cash amount received / charged before commission charges in the price currency | Yes | 100000 |
Net Amount | Cash amount received / charged after commission charges in the price currency | Yes | 99998.15 |
Payment Amount Ccy | Cash amount received / charged after commission charges in the execution currency
| Yes | 99998.15 |
accrued | The accumulation of the interest or income In case of BUY - buy side pays seller accrued amount In case of SELL - buyer receives accrued amount. | No | 0 |
commission | Total commission charges (absolute value) | No | 1.25 |
externalRef | External reference number | Yes | Ext\_1456787655\_DEMO1 |
desc | Description of the transaction | No | Main purchase of AAPL |
marketType | Market Type Options are:
| No | OTC |
tradeType | OTC (Over the Counter) - traded directly between counterparties without being listed on an exchange DMA (Direct Market Access) - directly on an exchange | No | DMA |
Example of Transaction Template
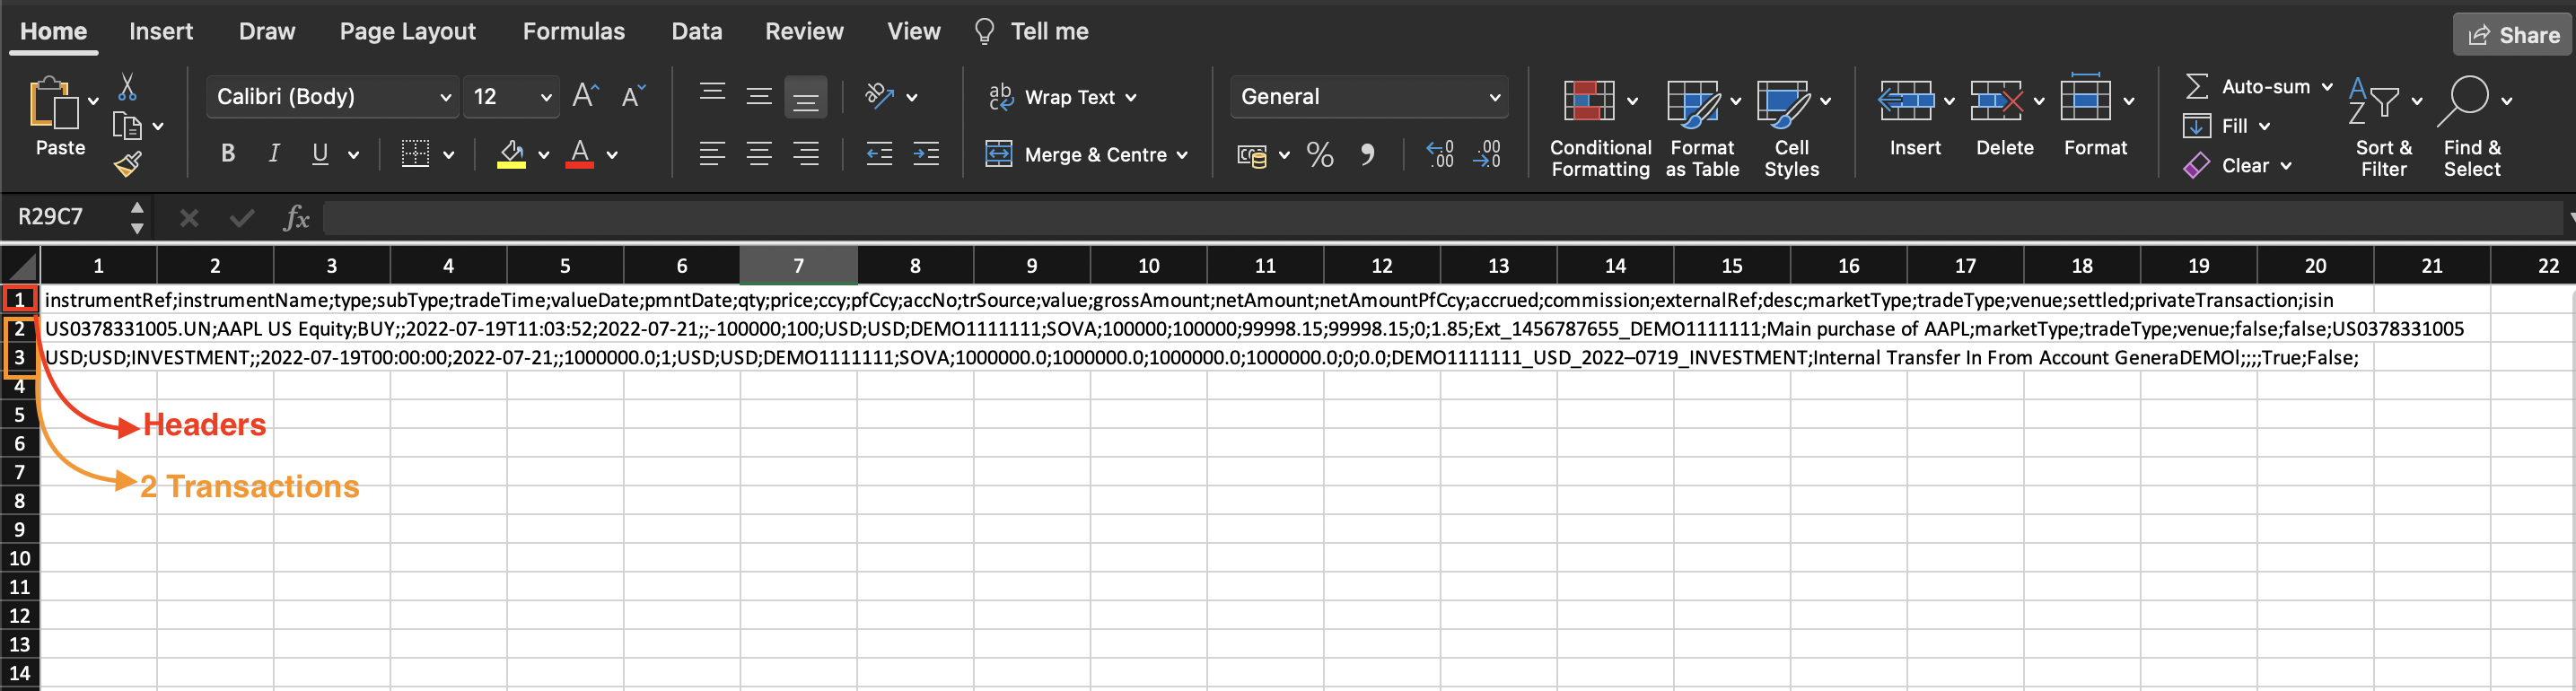
Check your CSV file for common errors:
Strictly adhere to the format of all fields, especially containing dates and numbers;
If there is no value for the particular field, leave it empty and separated by semicolons;
When adding records, check for and remove any duplicates;
Preserve the proper structure and format when save added data.
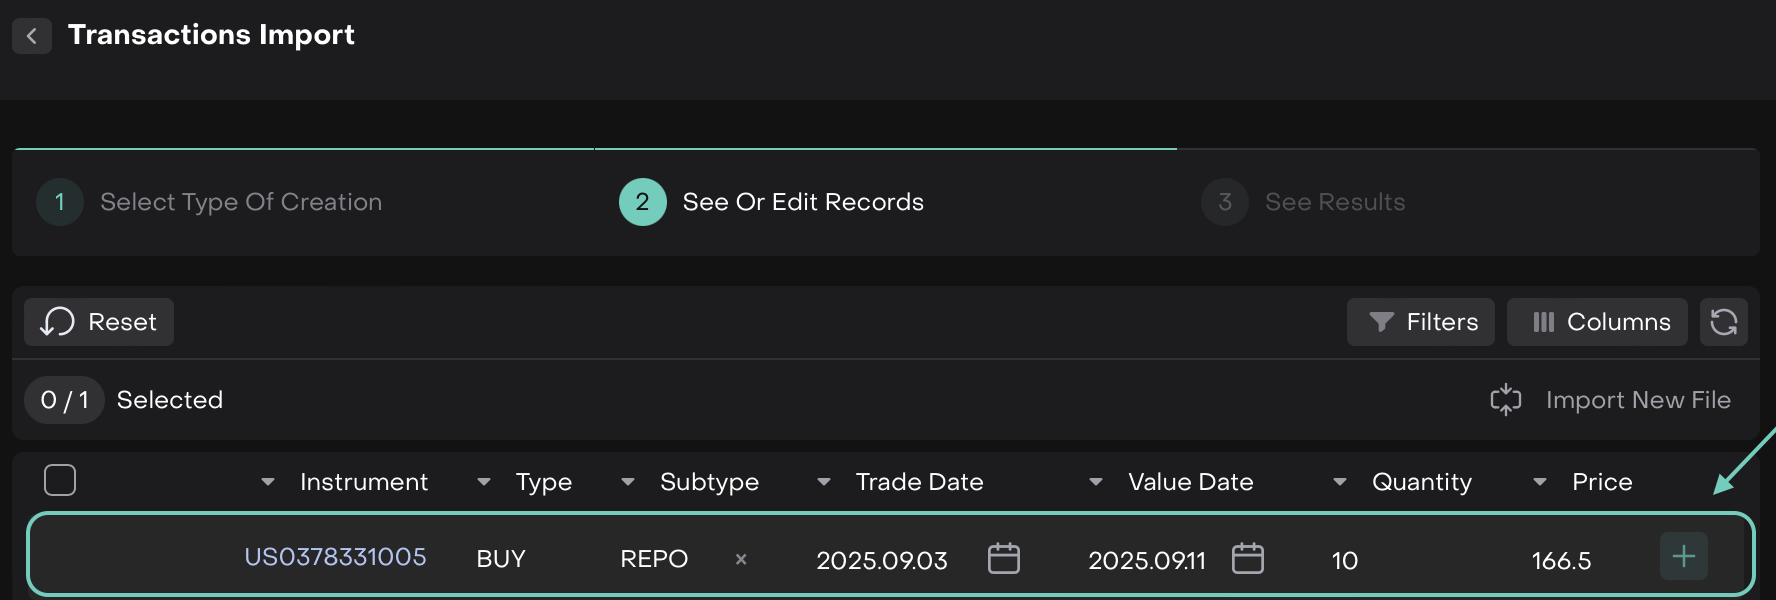
Step 2: See or Edit Records
Here, you'll see all imported or created records categorized into validation blocks.
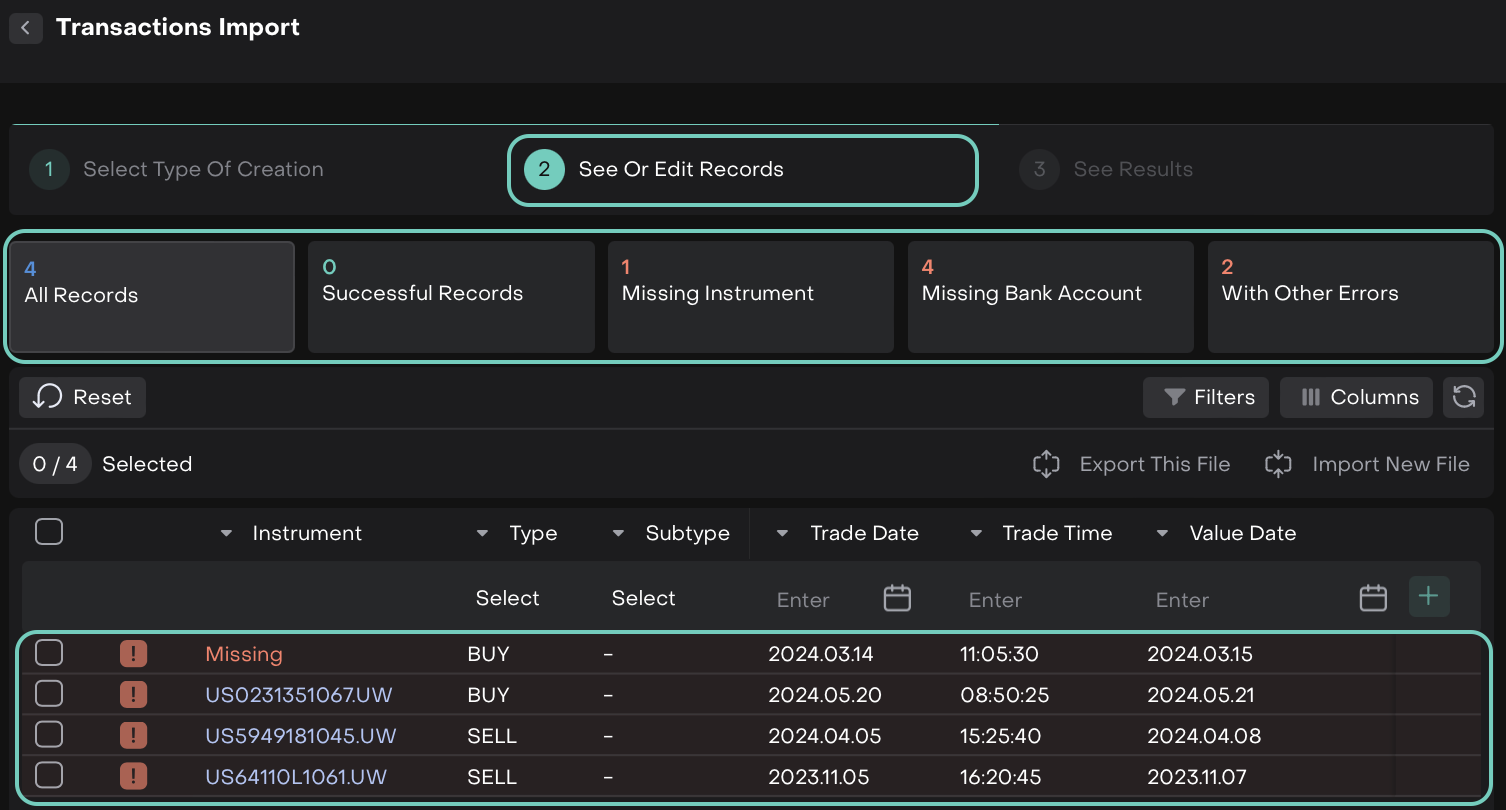
Make sure all issues are resolved so that Successful Records = All Records.
You cannot fix errors directly in the table view. You must click into each validation block to fix records individually.
Default Buttons in All Record Blocks
Depending on the validation outcome of your uploaded file, different categories of draft records may appear. Each category offers a specific set of buttons to help you act on the records efficiently:

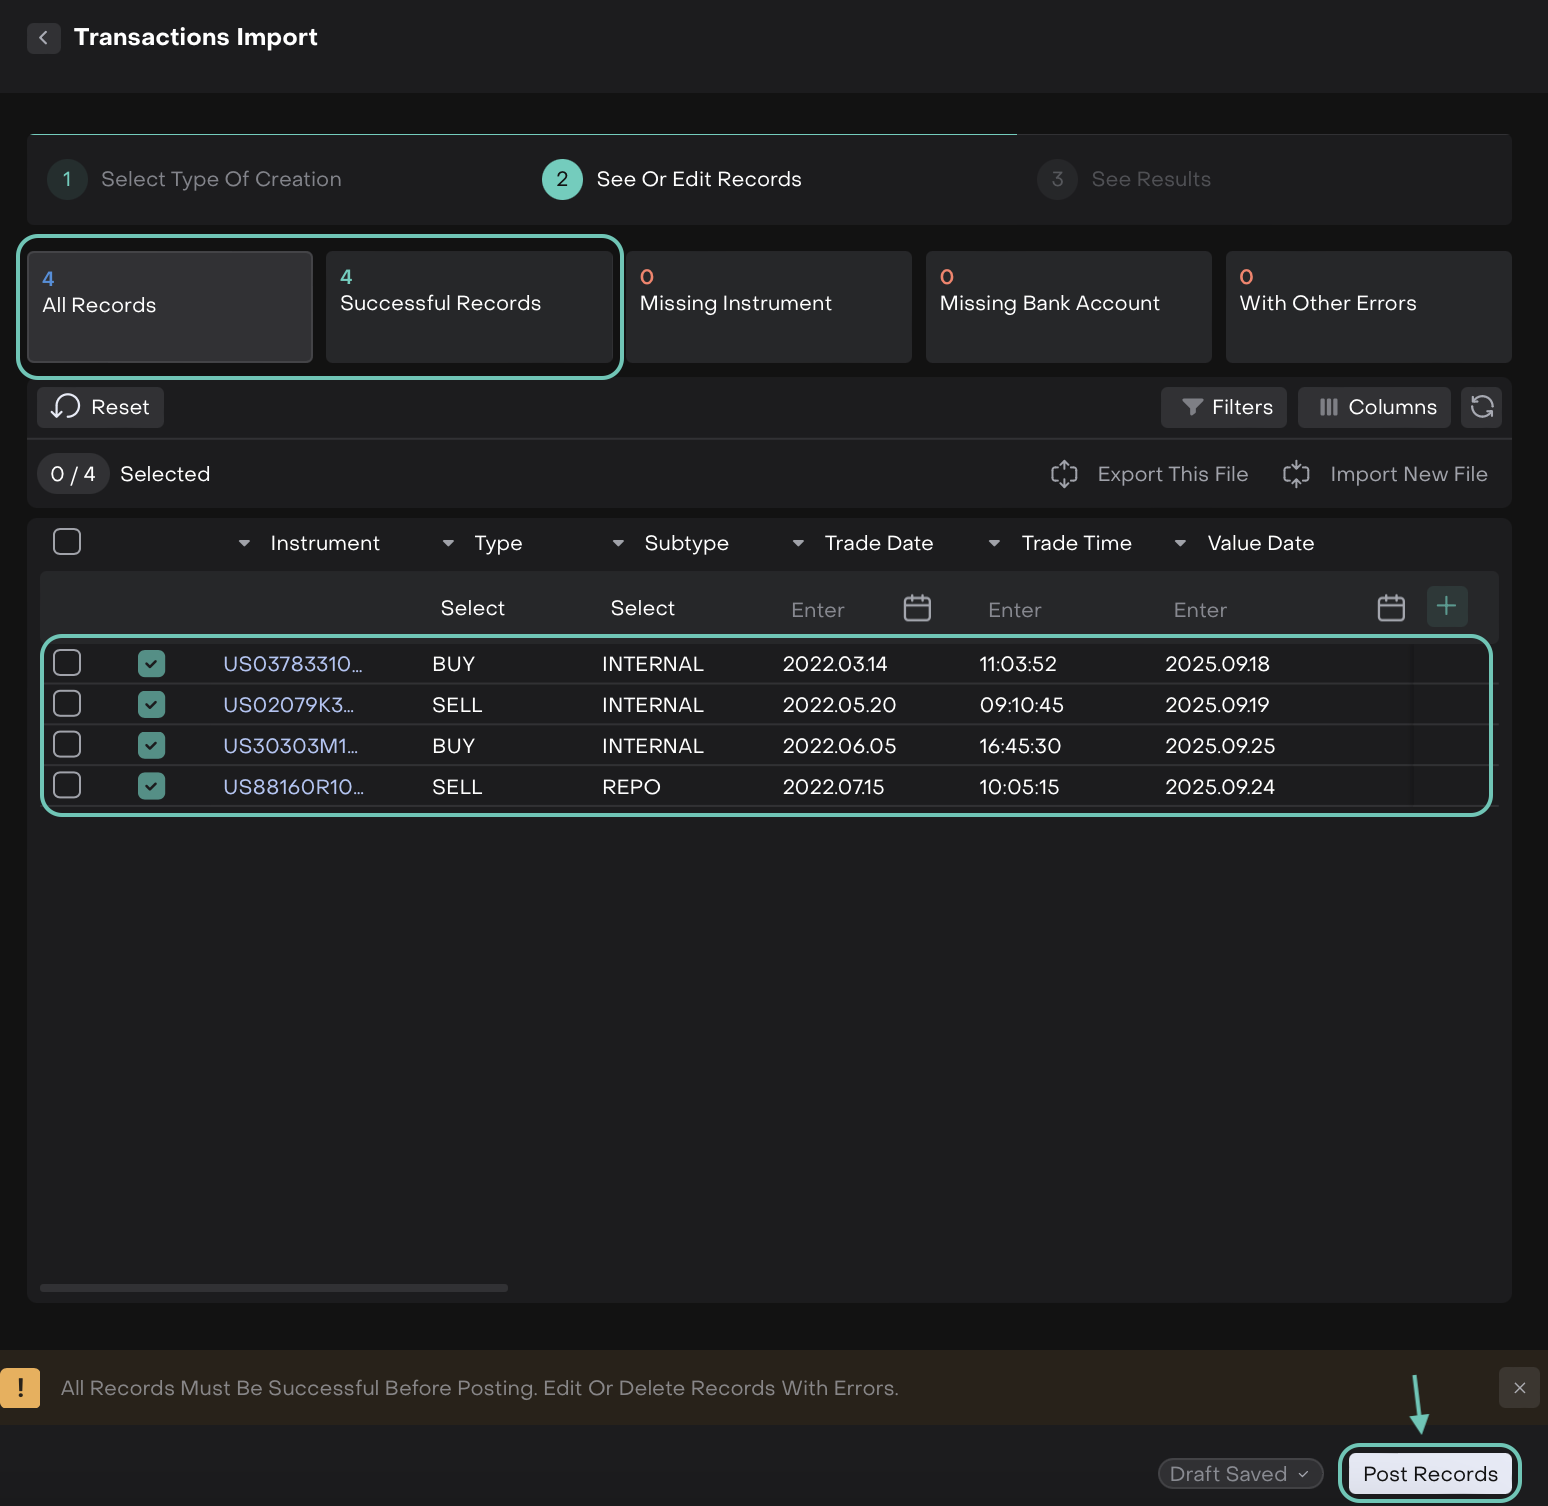
Once all records are marked successful:
The Post Records button will be enabled.
Click it to push all records to the Transactions module.
Step 3: See Results
Once records are validated and posted, they’ll appear in the transactions table.
After posting, two confirmation tabs will appear:
Successfully Posted
Not Posted
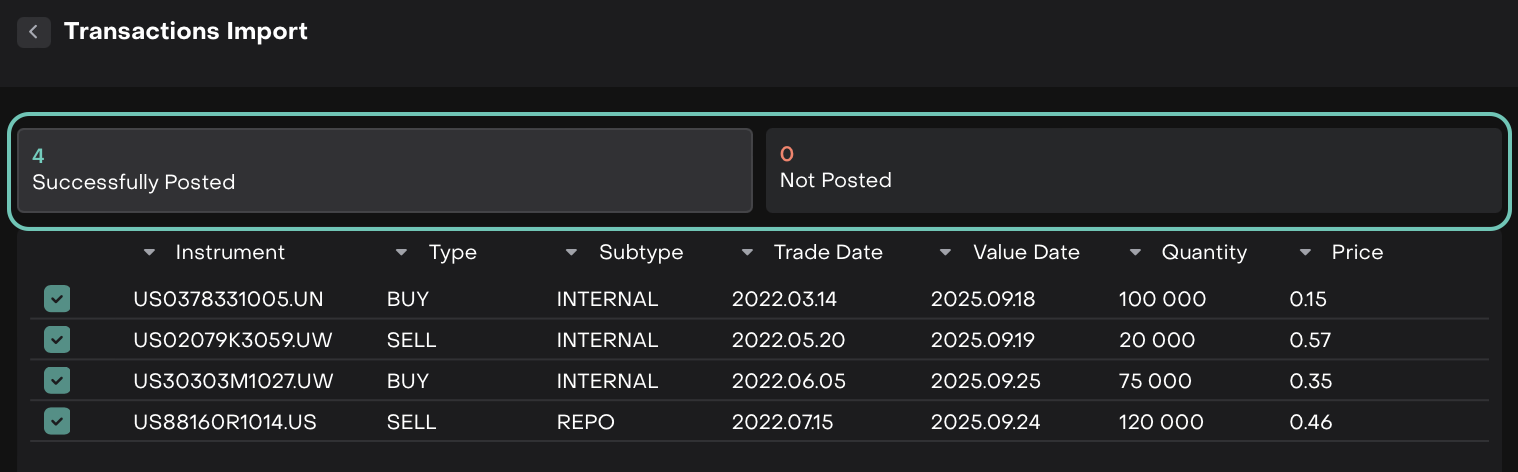
If any record couldn’t be posted, it will appear under the Not Posted tab for further action.
If any records fail to post, you can go to Not Posted tab:

Export as CSV – to download failed records and fix them.
Start New Import – to re-import corrected records.
Troubleshooting & FAQs
1. Can I load 2(two) or more CSV-files at once?
No, files shall be loaded one by one.
2. Can I load the same file several times?
No, the platform checks file names during loading and responds with error in case of duplicates.
3. Why I don’t see transactions from my CSV file on platform?
There are several reasons, why transactions from your CSV file are not displayed in the platform. In general it is caused by common errors in the file.
If you can’t find your transaction in All Transactions, please contact Support for help.
4. How can I correct errors in my transaction on platform?
There are two groups of errors:
Non-technical errors
Technical errors
Non-technical errors include: Missing Instrument, Missing Ccy or Missing PF Ccy.
Such errors are highlighted in red and available for User to correct. Open All Transactions → Find your transaction → Click on Missing data and choose correct value from the list.
All other errors are classified as Technical errors and corrected by Support upon request.
For example, Missing bank account.
5. Can I reload file with transactions to correct errors?
You can reload file with transactions to correct data.
You can correct only not active Transactions by reloading a new CSV-file.
In this case, your file shall be renamed, but externalRef of transactions in the file remains the same.